Friday, July 31, 2015

nature gelatin prints


While on our hike the first day of the 'Drawing from Nature' art camp, I had each child collect a bag of found objects that would be utilized during the rest of the week.

One of those projects would be for printmaking. 

I made each student a gelatin plate from a recipe I got on Linda Germain's website. Basically I made one large gelatin plate on a cookie sheet and then cut it into eight pieces so each child had one.

These plates should last me about six months if I take care of them properly, which means lots of fun projects ahead!

Starting with a light color, I asked them to roll it on the plate. We used water based Speedball block inks for this project. Each child then took a small leaf or leaves and put them on the plate after rolling on the color.

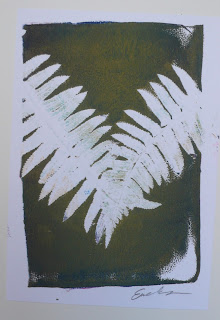
11 year old, study of positive and negative image with fern leaf

Then they rubbed a piece of Bristol paper over the top and pulled a print of the negative image of the plant.

Then they lifted the leaf/leaves off the plate and put another piece of paper on the plate and rubbed again. This time creating a positive image of the leaf/leaves.

10 year old


Then I had them pick a another color ink slightly darker than the first one plus something from their found objects slightly bigger than the first leaves to repeat the whole process again using the same two papers we had just used to print the first images

10 year old

I asked them to pick up the print with the positive image to use for the first of the second two prints.

Wait. What?! Which is the positive image?!


Did I mention what a great project this is for teaching positive and negative image?

I explained the positive image was the one where you could see the image of the plant, not just the shape. 


I wanted to make sure the second leaf took up more space on the gelatin plate than the first image so that some of the first image showed through the negative space.

6 year old

We then took the paper with the negative image and pulled the positive image off the plate, so now they had two prints layering on each paper. Each paper containing one negative image and one positive image.

Back to the collection bag to pick a large leaf. I suggested this was a great time to pull something like a fern leaf that takes up LOTS of space, but there were lots of other choices made too.

Now I asked them to pick their darkest color to roll over their plates and place down the large leaf.

9 year old

I also told them they could use whichever of the two papers they wanted at this point for the first pull but to remember it would be the negative image.

6 year old


They got some great imagery.  It really didn't matter if they stayed on register, although I had cut the paper not much bigger than the plates in order to make it easier for them to match up the various prints.

At the end, I suggested they each take the leaf that created their favorite image on paper and take a single print, both positive and negative, to keep. By this point, a couple of kids were ready for snack and did not do this but most wanted a single print of their favorite image.

8 year old


9 year old


It's easy to clean the plates up, just take some copy paper and blot it over the plates until no ink pulls up, put them back on the dollar store cookie sheet, cover with plastic wrap, and place back into the refrigerator for next time.

For me, it's hard to choose a favorite among the group of prints collected. The kids excitement level is high during the project and I love watching them get lost in the process of creating prints. 

It always feels like Christmas morning when we do printmaking of any kind in the studio because there is always that element of surprise when you lift the paper from the plate. You never know quite what you are going to get and the studio is usually full of "ooh's and ahh's" and squeals of "look at this one" when they get their first look at the images.

I'm looking forward to doing this project again with the campers at Seymour Art Gallery in August. I'll be running the "Drawing from Nature" camp with the gallery also and I do believe there are a few spaces left if you want your child to join. Just call the gallery to register.

9 year old

9 year old

11 year old

10 year old

10 year old

8 year old
(he put the print on it's side because it looked like a forest)

7 year old


10 year old

9 year old

9 year old

8 year old, pinecone
I did not think this would work at all, but love the ethereal quality of the print!

6 year old

6 year old

6 year old

9 year old

9 year old

9 year old

6 year old

6 year old


8 year old

8 year old

8 year old


8 year old

8 year old


Thursday, July 30, 2015

relief tiles inspired by nature walk

Along with the acrylic paintings, one of the first projects I had the artist create in the "Drawing from Nature" camp was relief tiles.

I asked them to create a relief tile to tell a story about our hike in Lynn Canyon the day before.

They could use the sketches they made during the hike or create something that they most vividly remembered from the day.

Then everyone was given a block of clay and they carved out the middle to about a quarter inch from the bottom, creating a clay frame.

I told them the clay they dug out of the slab would be used to create their story.

First they smoothed out the bottom of their slab and drew into the clay with a toothpick to create the background.

Then they began to build up the middle ground, finishing with a foreground.

When dried, I used a spray gesso on the work and had them use Golden high flow acrylic paint I have in studio to add color.  These paints by far produced the nicest results ever on this medium. I was just beyond thrilled with how the projects turned out.  It was so easy for the kids to get into the nooks and crannies of their work without losing all the wonderful details they had already created in the clay.

Most of the colors you see produced in their work were created by them with primary color only. I did give them a couple of browns I had because the struggle is real my friends when it comes to kids creating brown. I figured they did not need to fight that battle this day since they were already challenged getting their paintbrushes into all the crevices of the work.

And because I knew the kids would love it, I gave each a few drops of iridescent blue to create a water shimmer on their work. For those without water, they used a little "sparkle" wherever they saw fit. That is if they wanted a little sparkle on their tile.

It should come as no surprise that everyone wanted a little sparkle on their tile.

10 year old,  "river's edge"

9 year old,  "River bed"
(love the fish hiding under the log)


9 year old, "waterfall"

6 year old, "pinecone"

8 year old, "wooden bridge"

8 year old, "waterfall"

8 year old, "river bed"


7 year old, "rocky shore"

6 year old, "mud monster"

I have to stop here because the above tile has quite the story. It was riveting to all the other kids as the artist explained what she was painting. This is a mud monster.  My original understanding was that it was in the bottom left corner, just the leg sticking up. She corrected me and told me that was the head. I mentioned about making sure she painted all sides of the log the mud monster was hiding under and she quickly told me how very wrong I was, silly teacher, THAT was the mud monster's brain.

And with that, every head swiveled her way and wanted much more information on what was going on inside that tile. I think the boys might of even been a little green with envy that they had not thought of a mud monster with brains and body parts on display.

It was quite an impressive imagination and I loved hearing the story. 

8 year old, "white moth and hydrangeas"

During the afternoon hike, I let the two eight year old boys lead us astray to a part of the trails I had never been on before. While hiking we came across all these hydrangeas blooming in the middle of the woods. I was genuinely surprised to see them and it was quite beautiful with the sun streaming in through the giant trees, especially when one delicate white moth began to flutter among the blooms.

The moment was striking to me and I was pleased to see that it had obviously touched the heart of one of the students too.

11 year old, "Inukshuk"


Why have I never thought of this solution? The artist painted the frame and sides of her tile as a continuum of her relief. Brilliant!!

6 year old, "baby duck"

You will be seeing a lot of baby duck over the next couple of post. The artist did several different art works using baby duck. This tile was truly precious and so I have to show you baby duck up close. However as you can see, the artist wanted baby duck displayed as if swimming away from the viewer. I even double checked to make sure she wanted the bottom where she put her signature and she was quite firm that yes, this was the way the tile was to be presented. So although I want to really show off the adorable baby duck, I also want to be sure I honor the way the artist wants the work presented.


10 year old, " bumpy branch"

Along the trails, this artist collected a small branch with knobby things all over it that no one could identify. It was fascinating however, so fascinating she made a tile out of it. How amazing is that spider on the lower right side hiding under it? Did you find it? 

Aren't they amazing? Don't you want to get up from your computer and head out for a hike right now? I know the next time I'm in Lynn Canyon, I'll be remembering all these great works created from our neighborhood trail.