Tuesday, June 21, 2016

Preschool pastel birds

Yesterday was the last class for the preschool group.

I needed a project that I didn't need to worry about drying time and also would engage this very young group of girls for 45 minutes.

I decided to let them have some fun with the pastels.

After going back and forth about what to introduce for reference, I decided to present a pelican. Who doesn't like pelicans? They are a quirky creature with some amusing features to discover and draw.

Come to find out, the artist were not that familiar with pelicans and the picture I had pulled for them to observe and look at just showed the bird in a relaxed state.


Funny shape. Long beak. Quirky enough to bring forth some giggles but when I mentioned their beaks were like a basket, all giggles stopped.

What?! A basket?

And so I pulled my file of pelican reference one more time and brought out this picture.


The girls eyes were about as big as the pelicans mouth and they were all promptly fans of the lovable pelican.

And so we set off to draw our own pelicans. I asked them to find the different shapes of the bird.

What shape was the head?

The beak? Was it long or short? Fat or skinny?

What does the neck look like?

The body?

And then when they had recorded all the different shapes on their papers, I told them to connect them all together and finish their birds.

Once they were happy with their drawings, which they did on just a piece of copy paper, I handed them a piece of chalk to rub all over the back of the drawing.

After another onslaught of questions as to why they were rubbing chalk all over their papers, I taped them drawing side up on a piece of black pastel paper and asked them to trace over their drawings.

Questions answered as they lifted up their copy paper and saw a tracing in white chalk of their drawing on the black paper.

However more questions began when I handed each of them a black oil pastel and asked them to go over all the white lines with the black. Again with the whys while they began to think their art teacher was as quirky as the pelican, but I do this so their original drawings they worked so hard to complete are not lost once they begin adding the chalk pastel to the picture.

Because they like to color with the chalks and not only the room looks like a rainbow of color at the end, so do the kids and the oil pastel holds up strong against the layers and layers of chalk being applied.

It also makes for a pretty cool effect on the works too.

But as with all things with this age group when you allow them to explore and discover on their own, something magical happened to their final drawings. They were pelicans no more, but a colorful array of imaginary birds that only the 3 and 4 year old set can create.


We had birds with tufted crowns of feathers on their heads. A feature that when I had a second look at the original pelican reference is actually there, maybe not as exaggerated, but there is definitely a tuft of feathers on top of their heads. How excited was I to realize how well this child had really observed the pelican while creating her drawing. I also love the mix of pastels she put into the background. In her exploration of process, she created something really breathtaking.

And of course no bird with this age group would be complete without some very long eyelashes. A trait you will see throughout all the finished artworks.


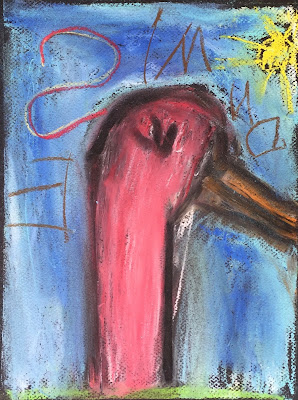
Pelicans became pink because what 4 year old in their right mind doesn't like coloring with pink? Except I didn't have a pink pastel in the box so she created this pink by layering red and white over each other several times until she was happy. And yes, there's that sun young children are so famous for too. This drawing just oozes happiness on a sunny day, don't you think? And I love the composition, the beak going off the page just reinforces the bird popping up in the foreground of the paper.


This eye. I love the way she created the eye. And it was very thought out too and important for her that it not be lost in the coloring of the picture. I am also so impressed with the way she added the light blue to the white in the bird. No eyelashes but there's that famous sun...this time smiling at us too.


And finally, this sweet red bird. You can see where she explored mixing the red and yellow in the sun to create the orange and she loved putting color on the paper and then blending it with a paper towel. (A sad and failed attempt on my part to try to keep their hands somewhat clean)

And can I just point out how darling their signatures are at this age? They have learned the letters but maybe not so much when it comes to just how much space they will need to get all the letters in place. But who cares? As long as all the letters are present...or almost present...it counts!

We have Simone, Stella, Maggie, and Elizabeth. Can you figure out who's who?

I love the way these drawings came out, they are ALMOST as precious as the little girls who created them.  Almost.


Friday, June 17, 2016

Real life drawing with teens

A while back I had a bouquet of flowers in the studio that were put to good use by the students.

I had purchased them for the Friday drawing class to use, but then they were also inspiring the 4/5 year old class with plaster paintings and the teen class later in the week.

I will always have a project to present to the teens, but after I share my idea, I also respect their thoughts and ideas on what they want to do during that class period. And what I heard loud and clear that night was they wanted to draw.

I love how each student tackled the project in front of them differently.

Once student ignored the floral arrangement and focused on a succulent I had in the room, using pen and ink with watercolor.


Another student at first thought she wanted to add watercolor but in the end stuck with only creating a graphite drawing. (which is why it is on watercolor paper) However knowing this student well, I believe she will probably continue to work on the piece at home and so it might by now actually have color on it.  Either way, the work stands on it's own as a drawing.


And finally the youngest student, not really a teen, but the class is a good fit for him and so he is here. What an amazing work for 11! He did the whole shebang! And captured the beauty of the bouquet in front of him using a water-soluble pencil and gouache.


It is amazing to me how the same project with the same group of students can create such different results if you give them freedom to be true to themselves. All three students still focused on practicing the same set of skills while creating artworks with their individual and unique perspectives.

I am proud of each and every one of them. 


Tuesday, June 14, 2016

preschool clay sculptures

Although I do not have an official preschool weekly art class, I run them whenever I get a request. Usually a parent will contact me to arrange a time and month with a small group of the friends. I keep these classes small, four children, and run them for 45 minutes each session.

Needless to say, working with this age group is a lot of fun. I am a huge believer in process over product and with children this young, there is a lot of exploration of whatever medium I put out.

I decided to start this month's class with clay.

Because who doesn't like clay?

I started by asking them to tell me about their favorite animals. Once they had thrown out a bunch of ideas and settled on something they wanted to create, I gave each child a large piece of aluminum foil to create the shape of their animal.

I like starting with a foil armature for a couple of reasons. It helps the clay dry quicker and also it allows the kids to make a larger sculpture that otherwise would be cost prohibitive.

The girls loved squishing together the foil, which of course, is the biggest plus.

I first asked them to just cover the foil completely with clay so that it became our "secret". They loved having a secret in their artwork.

From there I just gave them time to explore the clay and build however they saw fit to create their creatures.

rainbow bunny


Once they started completing their builds, I put out some toothpicks, popsicle sticks, and a few other "tools" for them to explore adding textures and details.

I asked some leading questions to each of them, such as, how does your animal hear?

How does it breath?

Where would you put the eyes?

Does it have a tail?

And the children then took another look at their clay and made decisions on if they wanted to add anything else.

Princess with the long blonde hair.  
(yes, I realize it is not an animal, but who can resist creating a princess?!)


I was so impressed with their final works. I had to keep reminding myself they were in preschool!!!

They too were very excited and it was difficult to leave their creations in the studio to dry for the week when class was over.

The following week they painted their clay.

I really wanted to girls to explore color mixing and so I spoke to them quickly about how color can be used by artist to convey emotion or temperature.

I asked them what color was happy and sad.

Angry and calm.

Hot and cold.

They caught on to this very quickly and began to throw out a variety of colors. I told them about an art movement called Fauvism, where all the artist used wild beast colors to help tell their stories and then asked them to think about the personality of their animals and use "crazy" colors to help the viewers also see the personality of their animals.

Although this sounds like a pretty complicated concept for preschoolers, they had no trouble and were off to the races quicker than I could say, "start painting".

As they mixed their primary colors together, they excitedly shared with each other what new colors they created.

pink cat
how great are the purple paws she added?


I deliberately gave them very small brushes so they would not glob on the paint. This made a huge difference to their ability to control adding the color to their works of art and slowing them down to really think about the details when painting.

And what amazing works of art they all created!

Once dry I added a layer of high gloss varnish to protect all their hard work and this Monday, their creations headed home with very happy and proud little artist.

No doubt they will be very cherished pieces.

Monday, June 6, 2016

favorite things mixed media

I was sad to see the 4/5 year old class end.

These two kiddos are so fun to work with and charm the pants off of me each week.

For the last project, I decided to create a mixed media work that I could build upon to keep them engaged for the hour class.

We started with a blind contour drawing of their very favorite animal.

Then I let them each take a fat water-soluble graphite and spend time adding any details they wanted to their drawing to make their animals really come to life.

Once they had finished I gave them a paint brush and a bowl of water and asked them to do over their drawings and tell me what happened.

Were they ever surprised to see the pencil marks start to become grey paint.

When they were tired of that, I asked each of them to tell me their favorite color and gave them a bit of liquid watercolor to paint the backgrounds of their pictures.

For fun I had them try blooming and allowed them to add salt then let them watch what happened. I'm not sure what they enjoyed more, flicking water on the painting or adding the salt.

I then quickly dried their works with a blowdryer and handed them a fountain pen and black ink. They truly enjoyed using the pens, just like every. other. child. who has ever played with them.

Then I put out some chalk and oil pastel for them to put any final touches on their mixed media project of their favorite things.

At the end of class, one child had created a picture of her favorite animal, a horse, using her favorite color, blue.

No surprise there as every lesson she wants to draw a horse and asks for blue paint.

4 year old, "Oceania, the horse" mixed media

I also wasn't surprised to learn the other child wanted to focus on a fox for their favorite animal. The fox has been showing up quite a bit lately in his artwork.

5 year old, "Foxy Phillipe" mixed media

For fun I had them title their artworks at the end of class. And once again, the pants were charmed right off of me.

Hope these two have a wonderful summer holiday.


Sunday, June 5, 2016

ink on acetate

The school year classes have now ended as summer draws near.

Here is one of the last projects I did with the elementary class.

Ink on acetate.

Each child found a reference picture of their favorite animal. I briefly explained the Fauvist movement to them and we discussed different moods and personalities that could be created with color. I then asked them to consider creating their animals in "crazy colors" inspired by the Fauvist artist.


Beginning with a permanent marker, each artist created a black line drawing. I told them to think about what a coloring book page looked like and to keep that in mind when drawing.


I then gave each artist a little pot palette of a couple of inks in their choice. What I love about having the kids work on acetate is that nothing absorbs, so they can move the ink around, pull the ink off, and if they really are unhappy, wipe the paper clean and start again. 


Because the ink continues to move around, it creates some really interesting things on the acetate. Each girl got the hang of the project pretty quickly and really enjoyed working on the unusual surface with the inks.


When they were finished, I quickly dried them with a blowdryer and then put a light coat of varnish on top so the ink would not move if they accidentally got wet. I then used a spray glue on the backside of the acetate and adhered them to a piece of Bristol paper.

In hindsight, I could of skipped the varnish and used the spray glue directly on the artwork and then mount it with the backside facing forward. To be truthful, I learned this lesson by accidentally doing just that with the turquoise bunny. I actually liked the final product this way much better, as it is more interesting when you see the layers the artist created from the first layer back- instead of the other way around. Their original black lines showed up much better this way too.

So in the future, I will present the project telling the kids the finished pieces will be in reverse when I mount them.

Sad to say goodbye to all the kids, but I'm guessing with all the summer camps I have booked it won't feel like that long until fall is here and I see them all again.

To see the summer camp schedule, go to KudzuStudio.com. I have a lot of fun projects planned and lots of camp themes to pick from.  

Enjoy the summer! Hope to see your child at camp.