Tuesday, November 28, 2017

sequence observational drawing

Nothing seems to make me more popular than when the kids get to eat what we draw.

And I'm not above bribing to hear children sing my praises!

I decided to have the K-Grade 3 class work on observational drawing. Gingerbread men seemed like the logical choice given we are now officially into the holiday season.

We started by doing a couple of warm up exercises. First I had the students create a large continuous line drawing using the blind contour method. Giggles ensued at the weird gingerbread men drawings created when they couldn't see their papers while drawing.

grade 1


Each child had their permanent black marker poked through a paper plate so they couldn't see the lines they were drawing.

They then created line drawings using their non dominant hand.

grade 2


And finally I had them create a quick drawing using a tonal view finder where they just colored the darks they saw in their cookies before adding the lines.

grade 2


Then we got down to business, pulled out three sheets of watercolor paper and began final drawings.

First they drew their gingerbread men whole. The young artist did careful looking to make sure they captured all the details along with the darks and lights.

grade 2


Then I asked them to take a bite.

Only one bite.

Anywhere they wanted on the cookie.

Then painfully they put the cookie back down without taking another bite and drew it again.

grade 2


They quickly caught onto the drill and were happy to hear they could now eat the entire cookie. I asked them to make sure they left all the crumbs on the paper towel they were using to place the cookie on while observing so they could draw what was left. I also told them they were welcome to leave a bit of the cookie to draw if they wanted.

The choice was theirs.

And then the children did their final sequence drawing and if they had any cookie left promptly ate it.

grade 1


At this point I gave them some graphite pencils that activate with water. I asked them to again draw in the dark areas of their cookies (using the lone surviving cookie to observe lights, darks and details)

The children didn't realize the pencil activated with water until I handed out some jugs of water and paintbrushes and asked them to go over their lines. I love surprising them sometimes.

I then placed out colored pencils and water-based markers to add color to their drawings. Again they had the opportunity to paint the markers with water to create a watercolor effect.

When they had finished adding the color I put out a bit of white paint for them to go back and add the icing and then they added some black pencil lines to bring back any details they wanted.

Finally using the colored markers one last time, they added back the color to the candies and sprinkles.

I mounted their drawings in sequence onto one piece of paper as a warning to all gingerbread men this holiday season to be diligent and to never forget.....


Run, run as fast as you can cause if you don't this is what happens when a child catches the gingerbread man.


Monday, November 27, 2017

watercolors inspired by "winter" animals

A lovely young girl had her eighth birthday party here at the studio a couple of weekends ago.

She loves watercolors and wanted to do something with animals that live in the snow. In past workshops and camps, she has gravitated towards penguins so I wasn't that surprised she chose to do an animal theme picture and winter animals to boot!

I pulled out reference for polar bears and penguins. I then had a couple of request for arctic foxes and snow bunnies. All easy request for me to fulfill.

I taped down large sheets of watercolor paper and gave the party guest time to work out their sketches on practice paper before transferring them onto the watercolor paper.

We discussed finding the shapes of the animals to begin a sketch and also how they could make artist choices to simplify their compositions from what they saw on the reference and even a bit about abstracting their animals and what that actually meant.

They then traced over their drawings with sharpie pen.

I gave a quick demonstration on some of the techniques they could utilize with the watercolors, wet on wet, scratching, salt, and blooming.

I then handed out a palette of primary colors and black.

Before they started I shared with them how they didn't have to paint their animals realistic colors, they could paint "crazy" colors that evoked feelings, temperature or was just their favorite color.

The birthday girl was using a diving polar bear for reference and she created an amazing sketch but was unhappy with her upside down polar bear, as she wasn't quite sure she wanted the bear diving underwater. Together we discussed and brainstormed all the different reasons her polar bear could be upside down.

birthday girl

And here is what she came up with, pretty fabulous.

grade 3

grade 3

These two friends used the same snow bunny for reference but I love the how interesting the compare/contrast is between the two artworks. Although the sketches are very similar the artist choices made afterwards are unique to each child. From choosing different directions for their paper, background and how they painted their rabbits.

grade 2

This arctic fox created by the youngest party goer was fun to watch. At the start, she used her watercolor paint as regular paint and had put it on thickly on one side and declared she needed more. I challenged her to see if by adding water she could get that blue paint to cover the entire paper and she was quite surprised to see that she actually could do it. She was then lost in adding more colors to the blue, trying her hand at using the water to bloom the color and of course, had a lot of fun adding salt. Her fox was a very solid blue at the end when she told me she was finished and so I handed her a bit of paper towel and asked her to find the highlights on the reference and blot them out with the papertowel. Love her use of brushstrokes around the fox to lead the viewer into her artwork.


grade 3

The simplicity of this diving penguin is in my opinion genius. I love that the young artist was brave enough to leave out the facial features even and look at the way she used her brushstrokes in the water to created a downward motion with the penguin!

grade 3

And this happy, leaping polar bear painted in pink! How sweet. Again we brainstormed a bit about what might be in the hand of that bear and she giggled at some of the ideas. No surprise this happy bear ended up holding a present while being created at a birthday party.

grade 3

grade3

And then there were these two penguins. I am so impressed at the restraint each used when using color and although these look simple, they took just as much time for the young artist to create.

At the end when it comes time to sign their names, I always give a little talk about making a mindful decision on how to add their names to the pictures. After spending an hour and half creating the pictures, we don't want the name that was written in less than thirty seconds to be the first thing the viewer notices in the artwork.  Children quickly catch onto this concept and I am always amazed at some of the creative ways they implement their names into the artwork afterwards.

Happy 8th Birthday Miss T!! Thank you for letting me share in your special day.


Thursday, November 23, 2017

water based marker monoprints

These lovely monoprints were created during a warm up activity to an acrylic landscape painting project in the teen class.


A warm up exercise!

Created with the humblest of art supplies, Crayola markers and a piece of acetate.


Each teen had picked a reference photo they were considering using for the acrylic painting. They put this photograph under the acetate and then drew the elements they were thinking of including in their painting onto the acetate with the markers.


We had talked a lot about how artist are always making decisions about what to put in and take out of their paintings. What to simplify, what the focus should be and how to move things around to create an interesting composition.


This quick exercise gave each of them a chance to begin making some of those decisions without getting bogged down in getting things "just right" in a sketch.


As they were drawing with the markers onto the plastic, and any old plastic will do for this project, there was some concern that it wasn't working as the ink just kind of balled up on the surface. It was hard to convince the artist that it was OK the marker wasn't covering the surface as expected but since it was a warm up exercise there wasn't too much stressing and they continued forward.


I then gave them a piece of damp paper and they turned their ink drawing face down onto the paper and rubbed.

When they pulled the acetate up, they were all pleasantly surprised with the results.

I was too.


I thought they were so stunning that I matted all of them for the teens to take home.

Thursday, November 16, 2017

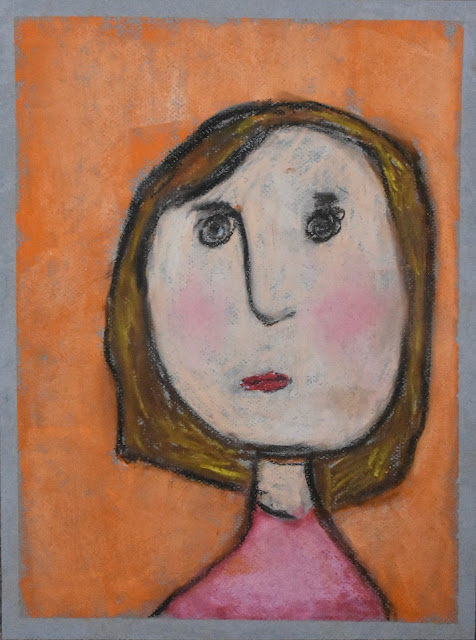
Amedeo Modigliani inspired self portraits

A couple of weeks ago, Artsy.net reached out to me and asked if I would consider creating a Modigliani inspired art project.

The Tate Modern will be opening a comprehensive retrospect of Modigliani's work on November 27th, (one of my favorite places to visit) and Artsy is looking to highlight the opening while also highlighting was a great source of educational material it offers on it's website.

I personally love Artsy.net. Not only when I'm looking for comprehensive information on an artist like Modigliani but the site has also been a great resource in introducing me to an array of historical and contemporary artist to introduce to the children at my studio.

Not going to lie, it is one of the first emails I open in my inbox over coffee in the morning.

I have introduced Amedeo Modigliani in the past, once creating Modigliani inspired princesses and also Modigliani inspired self portraits.

It's been a long time since I explored this artist with children and so I was quite excited to bring him to the attention of the Kindergarten through Grade 3 afterschool class.

We spent some time debriefing his art. The children were quick to point out how long the necks were and that sometimes the eyes were left blank or even colored in.

Amedeo Modigliani. Woman with Red Hair, 1917

Amedeo Modigliani. Chaim Soutine, 1917

Amedeo Modigliani. Girl in a Green Blouse, 1917

I found all the artwork reference at Artsy.net and since I had a class of boys and girls found some subject matter of both.

As a group we went over the basic "rules" of the face and then looked at how Modigliani broke the rules. Kids love a rebel and they were quick to embrace the artwork of Modigliani.

I then brought out the mirrors and began to have the children study their own facial features. I love doing this with children as it is such a great opportunity to bolster their self confidence in complimenting each of their unique features that make them, well, them.

How the lines of their eyes and eyelids are each unique, along with the shapes of their face, the fullness of their lips, and the tips of their noses. They giggle as I take a moment to talk about how wonderful each of their own unique features are and at the same time there is great satisfaction for me as I watch each of them quietly begin to sit up a little taller as they proudly acknowledge their own interesting traits that make them special.

As they were looking at themselves, they began to use black oil pastel on grey paper to record what they saw in the mirror. They also channeled their inner "rebel" inspired by Modigliani's work and exaggerated whatever features they felt inclined to enhance.

Once finished I then handed out chalk pastels for them to use for coloring.

grade 2.

I encouraged them to create colors as unique as they are by blending two colors together. This bright and sunny artwork truly captures the sunny disposition of the child who created it. Along with the serious gaze I have seen more than once as she listens intently in class as I share artist and techniques with her.

grade 2

This little boy is a sponge. He not only listens intently to what is said in the studio, he keeps it stored away and brings it back out at the most unexpected times. Here he has not only processed what we talked about with Modigliani's art but also brought back information from a prior project studying the Fauves using color to evoke emotion. He is a very calm and laid back child and creating his self portrait using greens certainly captures his personality.

grade 1

The collar! This young girl really focused on getting it just right, along with the right shade of pink. And please note her placement of light source!! Done all on her own no less. This art teacher was duly impressed as it also extends to how she added white to the green in the background, heavier on the light source side. A choice she made after asking me what the complimentary color would be to the pink and red she chose in her shirt.

May I remind you she is grade one!

These children really enjoyed looking at Amedeo Modigliani. And I am grateful for the email Artsy.net sent me as a gentle reminder of what a great project his artwork is for inspiration with young children. Now I just need to convince my husband we need to make a quick trip across the pond to London before the retrospect closes in April......


Thursday, November 9, 2017

papier mâché large mask

I decided to come up with some new projects for the after school art classes for Halloween this year.

I have been dying to create large head papier mache mask for quite some time and October seemed to be the perfect time to present it to the teen class.

pug photobombing the fox

Let me say upfront that this project was far more time consuming than I had anticipated. Some students came to the studio on the weekends in order to complete the project by Halloween -on top of the three hour and a half classes we used to create these great pieces.

grade 9

I'd be lying if I didn't say I internally panicked a bit worrying that I would lose the students in all the work.

grade 9

My oldest daughter had just redecorated and so I had some large Ikea boxes from some of her furniture purchases. I cut them into long strips about the width from my hand to my elbow.

grade 8

Each teen took a cardboard strip. I had them roll the cardboard up first just to make it a little easier to manipulate and then they circled the cardboard around their head, cut off the excess and taped it together to create the mask base. They worked in pairs for this part.


grade 7

I asked them to make their base a little wider than they thought necessary, anticipating as they taped details and used the mache it would become tighter around their head.

They then put an "x" on the outside front while wearing the cardboard structure to mark where their eye hole needed to be. I cut out the hole shape they wanted using a box cutter and they taped a window screen either on the inside of outside of the cardboard so they could see out but at the same time hide their face. These holes actually are the mouths of the mask.

grade 8

Once they had their cardboard cone shape complete, they used paper bags, newsprint and tape to round the mask and add any features.

Then it came time to papier mache.

"donaldette" grade 8

Because of the deadline, we used plain newsprint that I had already cut into strips. I used a watered down white glue for the paste. It dries quickly, is less messy, and kids don't seem to mind it on their hands nearly as much as they do the flour paste mixture. I also did not know if I had any gluten allergies in the class, so the glue paste was best.

Once the glue mixture dried, some of the teens were not happy where the paper didn't adhere smoothly and formed little raised gaps. For that I let them add a bit of masking tape over to smooth out any last details. Great thing about masking tape, it paints and looks just like papier mache.

grade 9

For smaller projects, it is all I use with kids anymore. Here is a bird created using masking tape instead of papier mache.


Then it was time for painting. It took to the very end of the hour and a half class to complete these mask. Thankfully they were so large that they were mostly dry by the time the last brushstrokes were added so I could get some great pictures of the kids wearing them.

grade 8

Oh how we laughed. 

grade 8

Let's be honest, I am guilty of laughing most of all. I had to cut the sound out of this video because of my very loud cackling.


The hours of labor was quickly forgotten once finished. I think they will make great sculptural pieces at home when not on their heads.

grade 9 best friends

I'm not sure the parents agreed as their eyes widen with wonder of where in the world they would find space for them. But the smiles and giggles they produced from the artist and families in the studio when finished were enough to fondly look back on this project for a lifetime.

Thursday, November 2, 2017

fall gourd artworks

The school year classes are now in full swing.

I figured we would kick off fall with our first project focused on gourds. I found some really beautiful ones at the garden store that I couldn't resist. I figured my husband couldn't whine about me spending money yet again on "useless" holiday decor if I told him they were for art class.

That's me, always thinking.

Since it was the first class back after a long summer break, I felt I would start with some warm up exercises. I used this project in all three classes, the Kindergarten through Grade 3, the Grade 4 through Grade 6, and the Tween/Teen class.


During the warm up the children used india ink with brushes on rice paper. These two artworks were a quick drawing focused on finding the lines in the gourd.

Aren't they amazing?! 3 minutes!! When I say quick draws, I do mean quick draws.


Another quick sketch was done in graphite and focused on finding darks and lights and different ideas on interpreting the textures.

Children also created a warm up using their non-dominate hand, using continuous line while not looking at their paper, and what I like to call "Haiku" drawing- getting the picture on the paper using only 5 or 7 brush strokes.

We did this for about 20 minutes. 


grade 2

The elementary class then created large ink paintings on watercolor paper for the rest of the class.

grade 1

grade 2

I gave no instruction on choices and decisions they made for their final work other than asking the kids to spend a few minutes going over their warm up pieces and looking at the things they liked and didn't like on the different works. We then discussed how they now had the ability to combine all the things they liked from the different papers into their final artwork.

Aren't the results great?!

After the Tween/Teen class finished their warm ups, I did give them a couple of minutes to add some colored ink to their rice paper drawings before starting their final artworks.


In my opinion, the warm ups are beautiful finished pieces of work.

I then challenged the tween/teen class to create a 4x4 acrylic painting with a limited color palette in just an hour. We discussed how artist are always working within certain parameters and having to make choices and decisions based on those parameters.

My goal with this first class was just to get the students to loosen up and having a time limit forced them to not get in their head too much and keep their paintings loose.


Because we were working with such a limited palette, Naples Yellow, Payne's Grey, and Titanium White, we used Golden Open Acrylic so they would have more time to play with blending before the paint dried.


I also gave them the opportunity to utilize palette knives along with the brushes.


The project was easy to alter so that it was age appropriate and fun for everyone and the results? Well they speak for themselves.