Showing posts with label kudzu art studio. Show all posts

Monday, November 27, 2017

watercolors inspired by "winter" animals

A lovely young girl had her eighth birthday party here at the studio a couple of weekends ago.

She loves watercolors and wanted to do something with animals that live in the snow. In past workshops and camps, she has gravitated towards penguins so I wasn't that surprised she chose to do an animal theme picture and winter animals to boot!

I pulled out reference for polar bears and penguins. I then had a couple of request for arctic foxes and snow bunnies. All easy request for me to fulfill.

I taped down large sheets of watercolor paper and gave the party guest time to work out their sketches on practice paper before transferring them onto the watercolor paper.

We discussed finding the shapes of the animals to begin a sketch and also how they could make artist choices to simplify their compositions from what they saw on the reference and even a bit about abstracting their animals and what that actually meant.

They then traced over their drawings with sharpie pen.

I gave a quick demonstration on some of the techniques they could utilize with the watercolors, wet on wet, scratching, salt, and blooming.

I then handed out a palette of primary colors and black.

Before they started I shared with them how they didn't have to paint their animals realistic colors, they could paint "crazy" colors that evoked feelings, temperature or was just their favorite color.

The birthday girl was using a diving polar bear for reference and she created an amazing sketch but was unhappy with her upside down polar bear, as she wasn't quite sure she wanted the bear diving underwater. Together we discussed and brainstormed all the different reasons her polar bear could be upside down.

birthday girl

And here is what she came up with, pretty fabulous.

grade 3

grade 3

These two friends used the same snow bunny for reference but I love the how interesting the compare/contrast is between the two artworks. Although the sketches are very similar the artist choices made afterwards are unique to each child. From choosing different directions for their paper, background and how they painted their rabbits.

grade 2

This arctic fox created by the youngest party goer was fun to watch. At the start, she used her watercolor paint as regular paint and had put it on thickly on one side and declared she needed more. I challenged her to see if by adding water she could get that blue paint to cover the entire paper and she was quite surprised to see that she actually could do it. She was then lost in adding more colors to the blue, trying her hand at using the water to bloom the color and of course, had a lot of fun adding salt. Her fox was a very solid blue at the end when she told me she was finished and so I handed her a bit of paper towel and asked her to find the highlights on the reference and blot them out with the papertowel. Love her use of brushstrokes around the fox to lead the viewer into her artwork.


grade 3

The simplicity of this diving penguin is in my opinion genius. I love that the young artist was brave enough to leave out the facial features even and look at the way she used her brushstrokes in the water to created a downward motion with the penguin!

grade 3

And this happy, leaping polar bear painted in pink! How sweet. Again we brainstormed a bit about what might be in the hand of that bear and she giggled at some of the ideas. No surprise this happy bear ended up holding a present while being created at a birthday party.

grade 3

grade3

And then there were these two penguins. I am so impressed at the restraint each used when using color and although these look simple, they took just as much time for the young artist to create.

At the end when it comes time to sign their names, I always give a little talk about making a mindful decision on how to add their names to the pictures. After spending an hour and half creating the pictures, we don't want the name that was written in less than thirty seconds to be the first thing the viewer notices in the artwork.  Children quickly catch onto this concept and I am always amazed at some of the creative ways they implement their names into the artwork afterwards.

Happy 8th Birthday Miss T!! Thank you for letting me share in your special day.


Thursday, November 16, 2017

Amedeo Modigliani inspired self portraits

A couple of weeks ago, Artsy.net reached out to me and asked if I would consider creating a Modigliani inspired art project.

The Tate Modern will be opening a comprehensive retrospect of Modigliani's work on November 27th, (one of my favorite places to visit) and Artsy is looking to highlight the opening while also highlighting was a great source of educational material it offers on it's website.

I personally love Artsy.net. Not only when I'm looking for comprehensive information on an artist like Modigliani but the site has also been a great resource in introducing me to an array of historical and contemporary artist to introduce to the children at my studio.

Not going to lie, it is one of the first emails I open in my inbox over coffee in the morning.

I have introduced Amedeo Modigliani in the past, once creating Modigliani inspired princesses and also Modigliani inspired self portraits.

It's been a long time since I explored this artist with children and so I was quite excited to bring him to the attention of the Kindergarten through Grade 3 afterschool class.

We spent some time debriefing his art. The children were quick to point out how long the necks were and that sometimes the eyes were left blank or even colored in.

Amedeo Modigliani. Woman with Red Hair, 1917

Amedeo Modigliani. Chaim Soutine, 1917

Amedeo Modigliani. Girl in a Green Blouse, 1917

I found all the artwork reference at Artsy.net and since I had a class of boys and girls found some subject matter of both.

As a group we went over the basic "rules" of the face and then looked at how Modigliani broke the rules. Kids love a rebel and they were quick to embrace the artwork of Modigliani.

I then brought out the mirrors and began to have the children study their own facial features. I love doing this with children as it is such a great opportunity to bolster their self confidence in complimenting each of their unique features that make them, well, them.

How the lines of their eyes and eyelids are each unique, along with the shapes of their face, the fullness of their lips, and the tips of their noses. They giggle as I take a moment to talk about how wonderful each of their own unique features are and at the same time there is great satisfaction for me as I watch each of them quietly begin to sit up a little taller as they proudly acknowledge their own interesting traits that make them special.

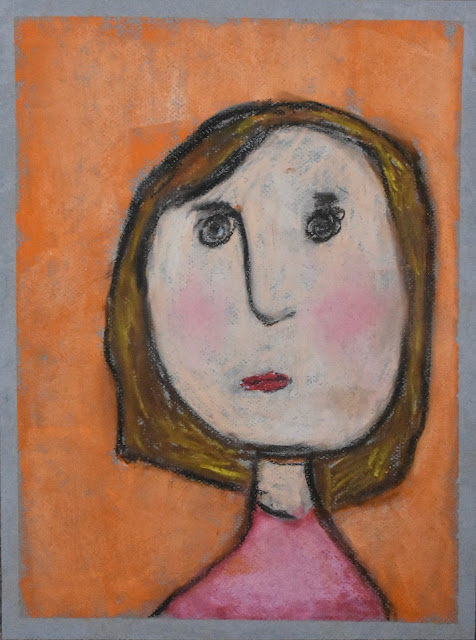
As they were looking at themselves, they began to use black oil pastel on grey paper to record what they saw in the mirror. They also channeled their inner "rebel" inspired by Modigliani's work and exaggerated whatever features they felt inclined to enhance.

Once finished I then handed out chalk pastels for them to use for coloring.

grade 2.

I encouraged them to create colors as unique as they are by blending two colors together. This bright and sunny artwork truly captures the sunny disposition of the child who created it. Along with the serious gaze I have seen more than once as she listens intently in class as I share artist and techniques with her.

grade 2

This little boy is a sponge. He not only listens intently to what is said in the studio, he keeps it stored away and brings it back out at the most unexpected times. Here he has not only processed what we talked about with Modigliani's art but also brought back information from a prior project studying the Fauves using color to evoke emotion. He is a very calm and laid back child and creating his self portrait using greens certainly captures his personality.

grade 1

The collar! This young girl really focused on getting it just right, along with the right shade of pink. And please note her placement of light source!! Done all on her own no less. This art teacher was duly impressed as it also extends to how she added white to the green in the background, heavier on the light source side. A choice she made after asking me what the complimentary color would be to the pink and red she chose in her shirt.

May I remind you she is grade one!

These children really enjoyed looking at Amedeo Modigliani. And I am grateful for the email Artsy.net sent me as a gentle reminder of what a great project his artwork is for inspiration with young children. Now I just need to convince my husband we need to make a quick trip across the pond to London before the retrospect closes in April......


Tuesday, October 31, 2017

gideon rubin inspired self portrait pillows

Have I mentioned what a huge fan I am of the work of Contemporary Artist Gideon Rubin?

This will be the second time I have introduced his work to children at the studio. The first time was with this printmaking project.

This time I had the young artist who were participating in the Contemporary Art themed camp focus on creating a self portrait inspired by Rubin. Also after hearing loud and clear from the campers in the Textile and Paint camp that they would love to do more work on pillows and such to put on their bed, I had the children create their inspired Rubin self portraits on canvas bags that I then turned into pillows.

I always find it interesting how children respond to his work. The idea that the facial features are left off the piece is difficult for some of them to accept, for others there is a great relief knowing they won't have to face the challenge of getting their eyes, nose and mouth correctly in the portrait.

Each child created a sketch on paper and once they were happy with their sketch, we transferred it onto the canvas bag using graphite paper. They then began adding acrylic paint that was watered down slightly, to help it move easier, onto the bag.

The results were lovely and caught the essence of each child perfectly.

9 year old

If you knew this young girl, you would be amazed at how accurately she captured the posture of how she holds her shoulders and the essence of her hair. There is no doubt who this portrait belongs to when you know the child.

7 year old

10 year old

The same can be said for these two young artist also.

7 year old

Of course some children needed to add their own twist to their portraits! Like these bunny ears added to this sweet portrait. And yes, her hair is that long and thick! 

9 year old

And then there were the two young artist who could not deal with not having facial features. I think he captured his feelings about my encouraging words to capture their portraits without facial features. 

He was not amused.

6 year old

The youngest artist did not want a pillow. She was quite excited to have a bag to carry to school. And no, I have not reversed the image. I am always impressed when children write their names so easily backwards! I don't know what possesses them to do it but she did that freehand and I think that is no easy task to do. She has this beautiful head of curly locks and I just smile at the way she decided to interpret this feature in paint.

I hope the kids enjoy these pillows for years to come. It was a lot of fun watching the kids create them.


Friday, October 27, 2017

conceptual art inspired by Matt Browning and Michael Drebert

During the Contemporary Art themed camp week, I decided to share a couple of artist I discovered while leading school group tours through the Vancouver Art Gallery's Vancouver Special:Ambivalent Pleasures exhibition.

Surprisingly I discovered that children really responded to conceptual art where the idea is more important than the result and were fascinated by the artwork of Matt Browning's collapsable wood sculptures carved from one piece of wood!

Matt Browning. untitled 2014

You read that right, one piece of wood! The time and labor that went into these works was mind boggling and kids were duly impressed. Browning's idea of creating sculptures that took time resonated with a generation of children where everything is available to them instantly, including the ones in my art camp.

The other artist in this room at the exhibition the children were excited about was Michael Drebert. Again working with the idea of labor and time, he refurbished a boat he called Poppy, built some oars, and then rowed out to Flower Island each day for the summer. At the end, he painted a very large but simple graphic poppy symbol on paper in india ink to represent the task and journey.

I liked the idea of presenting a project that took time, even if it was just a week of time during the camp. But I also worried that the children would not respond well to the project as there would be no instant gratification. 

I decided to have them spend the week building rubber band balls. I love my own. I have been adding to it for the past 7 years every time I get a rubber band from the weekly neighborhood newspaper delivered to my door or on the vegetables I purchase at the grocer. It is now the size of a softball and my family knows not to mess with one of my most coveted possessions.

I shared my rubber band ball with the kids, discussed the artwork of Browning and Drebert, and introduced creating a conceptual artwork based on labor and time.

Beyond my wildest imagination I could not of anticipated how much the kids would enjoy building a rubber band ball. Several of them asked to take the project home at night in order to continue adding rubber bands to the ball.  I was thrilled and where I thought four bags of rubber bands would be more than enough before the kids lost interest in the project, I ended up buying another five bags and would of needed more had the week not ended.


They were not easy to start. I did not give the kids a wadded up piece of paper to begin wrapping with, these are made strictly from rubber bands. Where I worried kids would want to give up or get frustrated at the beginning as starting the balls was challenging or get bored with the repetitive task of adding endless rubber bands to build the ball was all for nothing. Of all the projects the children created, I believe these balls were what they left the studio with most excited and proud of that week.

After building these rubber band ball "sculptures" inspired by Matt Brownings' wood carvings, it was time to create a symbolic artwork of the labor inspired by Michael Drebert.

I put out india ink, brushes and quill pens. We discussed symbolic drawings and then I sat back and watched these young artist figure out a way to symbolically represent their rubber band balls they had worked so hard on all week.

7 year old

9 year old

A couple of children created strong, simple black line images in keeping with Drebert's work but others began to add their own details and twist.

10 year old

9 year old

Adding shadow, color

6 year old

and even action to their artwork!

7 year old

Do I think these artworks will end up framed in their bedrooms? no

Do I think the balls are displayed and coveted at home? yes

And do I think these young artist walked away having had fun discovering conceptual contemporary artist and exploring creating work where the idea was more important than the results? absolutely