Showing posts with label monoprint lesson. Show all posts

Thursday, November 23, 2017

water based marker monoprints

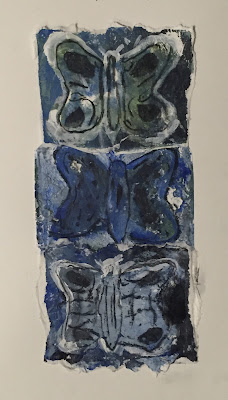
These lovely monoprints were created during a warm up activity to an acrylic landscape painting project in the teen class.


A warm up exercise!

Created with the humblest of art supplies, Crayola markers and a piece of acetate.


Each teen had picked a reference photo they were considering using for the acrylic painting. They put this photograph under the acetate and then drew the elements they were thinking of including in their painting onto the acetate with the markers.


We had talked a lot about how artist are always making decisions about what to put in and take out of their paintings. What to simplify, what the focus should be and how to move things around to create an interesting composition.


This quick exercise gave each of them a chance to begin making some of those decisions without getting bogged down in getting things "just right" in a sketch.


As they were drawing with the markers onto the plastic, and any old plastic will do for this project, there was some concern that it wasn't working as the ink just kind of balled up on the surface. It was hard to convince the artist that it was OK the marker wasn't covering the surface as expected but since it was a warm up exercise there wasn't too much stressing and they continued forward.


I then gave them a piece of damp paper and they turned their ink drawing face down onto the paper and rubbed.

When they pulled the acetate up, they were all pleasantly surprised with the results.

I was too.


I thought they were so stunning that I matted all of them for the teens to take home.

Thursday, March 30, 2017

etchings of beloved stuff animals

A while back I did an etching project around Halloween inspired by Rembrandt's etchings that I had seen during a visit to Amsterdam.

They were creepy and eerie, perfect for Halloween, but I have been dying to bring the project out again with something a little more cheerful.

So in the "Landscape and Still Life" camp, I decided to have the campers create etchings of their beloved childhood stuffed animal. We all have a doll or stuffy that we look back on fondly and I thought it would be a lovely still life subject to always have a remembrance of the special companion in years to come.

I handed each camper a very thick piece of acetate. It is quite small so the actual etching process doesn't overwhelm a child. 


Then using a sharp point stylus, the kind used in scratch art, each child began etching in the dark areas of their subject.


When they felt like they had finished, we smeared some printing ink over the plate, wiped away the excess and had a look to see if they wanted to add any more lines. When they were completely happy, the campers began pulling prints. 

They all learned quickly that there is a fine art to just the right amount of water on the paper and pressure between the plate and paper. If I had a press, this step would be a little easier but I'm still on the lookout for a small second hand press at the moment.

Each child inked their plate, wiped away whatever amount of ink they wanted from the plate, and then placed it on the damp paper. I then had the campers turn the paper over and give the paper and plate a very good rub. For good measure they could take a clean brayer over the paper if they wanted. 

I have them turn the paper over to try to keep the print side clean.

printing plate, 8 year old

8 year old etching print

The plates were so pretty at the end, I actually mounted them too. I put spray glue on the inked side and simply adhered it to a piece of paper.

etching plate, 11 year old

etching print, 11 year old

A couple of the stuffed animals were very well loved and obviously very special to the child, which made it worthwhile to keep trying when pulling a good first print proved to be challenging.

etching plate, 11 year old

etching print, 11 year old

This particular teddy bear had such a beautiful history. It actually belonged to the campers' mother, then her grown sister, and now has been handed down to her. How lovely to now have a group of prints of this very special family keepsake.

The older two campers finished earlier than the younger one and so I brought out the gelatin plates for them to explore. Both girls really enjoyed printing with them.


I think this artist got a lovely series of prints of her stuffed animal.


As did the other camper, how cute is the sun? This bear is definitely the sunshine in this family's life.

I love that I had the opportunity to introduce an etching project with a subject matter other than skeletons and mummies. Next on the horizon is doing self portrait tronies, just like Rembrandt did all those years ago.


Sunday, March 12, 2017

monoprint and paint

This started off as a project for a child that finished early.....

Taking a brayer and a piece of palette paper (wax paper or freezer paper on the waxy side would work too) and spreading a dab of black water based oil paint over it.

rose by 7 year old


Make sure your wax paper is a smaller size or exact size of the paper you will be printing onto.

I then had the student create a continuous line drawing of some flowers I had in the studio for another project. Once finished she placed down a piece of clean paper over the waxed paper with ink and then her continuous line drawing and traced all the lines she liked.

When finished she took off her line sketch and pulled up the paper off the oil paint and had a inked line drawing monoprint.

crazy bird, 10 year old


They I gave her a small dab of white water based oil paint and let her paint into the monoprint.

The student loved it.

The other students loved it.

And so a few more asked to do the same thing.

The project was a great study on values as the students were working with white paint on white paper.

In the end, I only managed to capture of few images of the many artworks completed but needless to say there were some very pretty final artworks.

rose, 13 year old


Funny how sometimes lovely and exciting projects happen in the most unexpected ways.

Saturday, May 28, 2016

"Flowers for Mother" a monoprint zine

I'm going backwards here a bit.

This zine was created by a student in the teen class the week leading up to Mother's Day.

It was a gift to her mother.

She created the zine itself using a folding method. Creating Nature has a great tutorial if you want to try one yourself.

For this project, I brought out some very early 1900's postcards I have collected for reference. Many of them have lovely illustrations of flowers on them which was the inspiration for her zine.

Hasn't she created a beautiful color palette too?
Using the gelatin plate, she created a series of floral monoprints for her mother.

zine cover, "Flowers for Mother", 13 year old

For this project I had her sue Golden Open Acrylics, just the primary colors along with white. The artist had to work fast but the Open Acrylics gave her a bit more time as they do not dry as quickly.

I love the title of her zine. Although I don't think she calls her mom, 'mother', it seemed appropriate given the old fashion nature of the zine. She chose to write the title in a soft graphite so it could be smudged a bit.

zine page one

It was a joy to watch her as she created this zine. As each print was pulled, she got more and more excited by the work.

zine page two

There were several, "Oh, I really like this one" as she made her prints. 

zine page three

I have to agree. It is hard to pick a favorite from the beautiful floral prints created. I truly love the soft color palette she created. LOVE!

back cover, "a book of monprints, Mother's Day 2016"

I sure hope her mother enjoyed the gift as much as her daughter did making it for her. She was just so pleased at the end when the zine was finished. 

What a lovely little gift she created to give to her mother.


Friday, May 27, 2016

Gideon Rubin inspired portraits and other gelatin prints

I have been fascinated by the work of Gideon Rubin for some time now and when the curator of Seymour Art Gallery gifted me some photographs from her family collection of people no one no longer remembers, a project was born.

I am fascinated by old photographs, especially ones found in thrift stores and flea markets where the people no longer have names but just reference a moment in time. That is probably why I find Gideon Rubin's work so appealing, faceless portraits from another time.


class of 1947, Gideon Rubin

When I pulled out the photographs for the preteen class to look at, they were fascinated by the story about no one remembering the people within the photos. They spent a lot of time looking at them and made a connection that many of the photos were of the same two people throughout their lifetime. The girls decided they were brother and sister.  

Two of the students settled in on a couple of photos they wanted to use to create a gelatin monoprint inspired by the work of Rubin while the others focused in on creating some animal mono prints.

work in progress, 11 year old

These gelatin plates are something I made last fall and I cannot believe after all the projects throughout the year that they are still holding up great. They have been such a great addition to the studio and I cannot recommend adding them enough to your supply list. They are so easy to make too.

Believe it or not, the 11 year old was not very happy with this work of the little girl she created. She felt she ended up looking "fat" and not nearly as cute as the picture that had won over her heart.

11 year old

She was so frustrated in fact that once she pulled the print, I had her move on to an animal portrait in order for her to end the project on a positive note.

11 year old

Personally I loved her portrait inspired by Gideon Rubin, but at the end of the day it is not about what I like and so I am quite pleased she is so happy with her final animal print and hope one day she looks back on the portrait and realizes it is quite wonderful too.

On the other hand, this 10 year old artist was beyond pleased with her final Gideon Rubin inspired portrait.


10 year old

She chose this portrait of a woman because she really liked the hairstyle. I think she got such a wonderful monoprint from it. I'm not sure her mom "got it" at first, but the artist was so pleased at the end and in love with her work, which made me so very happy.

10 year old, portrait of a woman

She had quite a bit of time left in class after creating this piece and so her attention then turned to her favorite subject in the world, cats.

10 year old

Another artist who left the studio that night quite proud of her work was this 11 year old. I have no doubt this lovely horse is going to find a special spot in her home. She worked so hard on it.

11 year old

I always have the kids pull the ghost print with the leftover ink on the plates. Sometimes they are wonderful and the kids actually like them more than the original and sometimes they are "eh", but I do find students are always quite excited to find out what might be pulled with the leftover ink at the end.

In this case, the artist loved her ghost print.


Cats were the de rigueur of the day. They were also the focus of the 12 year old in the class.

12 year old

Those eyes! Who could resist those eyes!

12 year old

This cat maybe because it looks "so over" everyone purring about how cute the above cats' big eyes are. I love the emotion the artist captured in this piece.

I was pleased to see each student walk away from this project happy and proud of their artwork. I always find it interesting to see what each child takes away from a project or how they decide to tackle the project at hand. This night was no different.

I am so grateful for the jumping off point the gifted photographs from a friend provided, along with the beautiful work of Gideon Rubin. It made for some beautiful art created by the preteen class at the end of the night.


Thursday, January 21, 2016

butterfly mono prints on gelatin

There was a birthday party in the studio last night for a 13 year old girl.

After a few discussions with her and her mother, she decided to do a project on gelatin printmaking for her and nine of her friends.

Let me just say, there is not a rock concert in the world that holds a candle to the volume level of a small room filled with ten very happy and excited 13 year olds. I believe my ears might still be ringing.

The girls started off by sketching a butterfly shape on card stock and then cutting it out to use as a stencil.

birthday girl

Then I pulled out the gelatin plates. The girls were fascinated that they were using a jello substance to print on and even asked if they could eat it, which I quickly explained they could not since it also contained glycerine in the mixture.

They first started with a piece of bristol that was cut slightly larger than the gelatin plate. They "inked" the plate with some white, blue and yellow acrylic paint using a brayer, created some texture by stamping into the paint with some bubble wrap and burlap, then pulled a print.

I then asked them to put some blue paint on the burlap and stamp that into the plate, take the same piece of paper and pull another print.

Then using primarily white paint, asked them to once again color the plate, place down their stencil, and using the same piece of paper pull yet another print.


I had also given them two sheets of palette paper, the same size as the bristol. 

(I think freezer paper would work just as well)

Using the non-waxy side of the palette paper, I asked them to pull a ghost print of the leftover paint on the plate.

Now I asked them to use black and blue to paint the plate. They laid down a bit of string and their stencil and now using the the second paper they had made a ghost print on, pulled another print.


Then using the first piece of paper, the bristol, they pulled a ghost print using the leftover ink.

This made some of the girls unhappy, not going to lie. They liked the bristol print they already had and could not understand why they were printing on top of it again.  They were even more unhappy when they pulled the ghost print as they lost a lot of the previous work.

But all was not lost because once again, they added a lot of white to the plate, laid down the string and the stencil and pulled the last and final print on the bristol paper, the first paper they started with and voila! that is the middle print you see on all this artwork.

Happy girls again.


Now with the leftover white ink on the plate, they took the final piece of palette paper and made a ghost print using the non-waxy side of the paper.

Once more laying down blue and black paint, the string and the stencil, they took one final pull using the third paper.

They now had three complete prints of their stencil and a stencil that was barely hanging on in one piece. Thankfully they no longer needed it to complete the project and could throw it away.

At this point, I told them they could go into their work with a small paintbrush and add any details they wanted. I stressed trying to stay loose and use the brush sparingly so they did not loose the essence of the print work they had just finished.


Once done, we gave the tables a quick clean and began mounting the three prints. The idea was the combine them so it looked like one piece. 

The girls first cut the bristol paper to the paint lines using scissors and glued it down in the center of the paper.


I then showed them how they could use the top of the paintbrush dipped in water to "cut" the two palette papers. All you do is create a line with water and then gently pull. This gives a very organic edge to the work, which lets it blend nicely into the bristol paper when pasted on top.


Or not, as this artist decided to do. She wanted all three prints separate and it's good to see the project looks just as nice. I love when students stay true to themselves and in the process teach me something new about a project idea.

Anyway the idea of "cutting" with water and the back of a paintbrush made some girls quite unnerved and so I assured them it was fine to use scissors if they wanted too.


They cut out the last paper, using either scissors or the paintbrush and water, and glued it on top of the bristol paper. For glue, we used just a basic glue stick, nothing fancy.


And once all three pieces were mounted together, each girl had the opportunity to add a bit of charcoal into their butterflies for one last bit of detail.

Then it was time for cake and goodie bags.

And more squealing, giggling, and general noise at a decibel level that would impress any rock band.

The birthday girl had taken the time to make each goodie bag reflect the likes and personality of each friend. Is that not the sweetest? I think it was a great example of the character of girls in the room that night.

I hope they all had fun, I sure enjoyed meeting them.

Happy 13th Birthday Ms. A!!