Showing posts with label holiday art workshops. Show all posts

Monday, December 7, 2015

putz inspired holiday house paper sculptures


When creating projects for a series of holiday workshops I'm running in the studio, I kept coming back to one of my favorite holiday decorations in our home, little cardboard Christmas houses made by Putz.
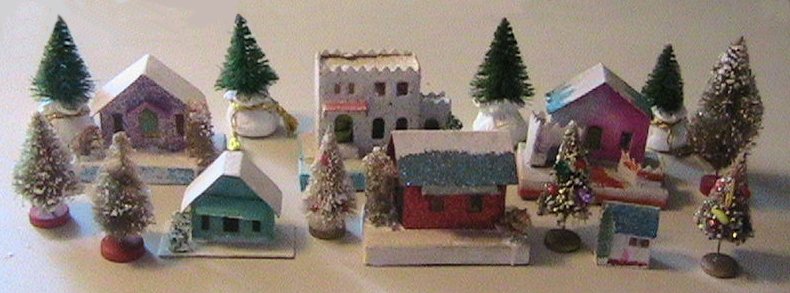
(not mine, but could be yours if you check out Ebay)

I love all the old vintage Putz houses and whenever I'm lucky enough to come upon one, will scoop it up immediately and bring it home to add to our holiday decor.

While staring at the one I have sitting on the desk by my computer, I thought why not create a class around one?  After running a birthday party where the kids created watercolor birdhouses, I figured it wouldn't be too hard to construct a project inspired by these sweet houses Putz created through the years.

9 year old

So I found a template online for a simple house construction, transferred it onto watercolor paper and cut them out for the kids to design their homes.  Each child started with a piece of cardboard and had to make a decision as to whether or not they wanted a fence around their house (they all did). 

I had them add a light layer of white paint on the cardboard and then while that was drying, each child designed a fence to go around their home. These were created on a strip of 1.5 X 12 inch watercolor paper.  A quarter inch of the paper was folded so that it could be glued down on the cardboard and then they cut any type of edge they wanted for the top of their fence.

I also had some hole punches and other punch designs I have collected over the years that they could add to their fence design. This was a great exercise in pattern making.  

They then painted both sides of the fence and dried it with a blow dryer.

By the time they finished their fence, the white paint was dry and the fences were hot glued onto the cardboard. Then it was time to start designing their homes.

9 year old

Each child drew their designs on the INSIDE of their houses. I did this knowing they would without doubt want to erase some things and by doing the original work inside the house, we wouldn't have to worry about any of those pencil lines on the finished house.  When they were finished, they took a sharpie pen and then drew their final design on the side of the house that would be showing.

I then cut out all the windowpanes they had designed with an x-acto knife. I figured it was best if I did this part as I didn't think the workshop would be that successful with children running to the emergency room for stitches.

When all the panes of glass were cut out, they glued on some gold color tissue paper on the inside of the house over the windows so when they added a battery operated votive candle at the end, it would have a warm glow through the windows.

9 year old

Then they began painting their homes in acrylic paint. When the kids were finished painting the house, they went over any areas that were still wet with a blowdryer.  When completely dried, it was time to glue the houses together and also glue them onto the cardboard.

Then I gave the kids some modeling paste to add some snow clumps with a palette knife. This was again dried to the touch with the blowdryer. 

It was time for the glitter.  Each child covered their entire sculpture with a mixture of white glue mixed well with a bit of water. I had a couple of stations set up where they could dump iridescent glitter over the houses on large cookie sheets.  I figured this would cut down on the amount of glitter that would be scattered all over the studio.

Feel free to laugh here.

Then the part they had all been waiting for, adding lots of trees and other bit of holiday fun to their homes.

They worked right up until the end of the workshop, which was two hours. They were all so happy with their creations.  Each one came out darling and rivaled anything Putz ever made.  I know I would scoop them up and put them into my collection!

I'm guessing they will quickly become cherished pieces of their families holiday decor for many years to come too.

And here's a quick video I made of my sample house with the battery candle inside so you can see how pretty they look at night.


Next Sunday we will be creating beautiful silk painted scarves in the workshop to give as gifts.  For more information, check out the website at KudzuStudio.com


Tuesday, November 24, 2015

Acrylic Winter Paintings

On Sunday, I ran the first of the Holiday Workshops for this season. Each child created an acrylic winter painting on canvas.

I had put out a lot of different options of winter references to inspire the kids and each took some time to sketch out their compositions. I encouraged them to focus only on putting the shapes of the objects on paper, not details, as we would create those while painting.

When each child was happy with their composition, they transferred their sketches either freehand lightly on the canvas with pencil or by tracing their sketch onto the canvas with carbon paper.

Then I asked them to paint in their background only, discussing the importance of adding white to all the colors they were mixing to convey "winter".

7 year old

Once they had their backgrounds completed, they began to work on their subjects.  I showed each child how to use the brush to create interest with line, how to mix the colors directly on the canvas, how to find the shadow and highlights to add and asked them NOT to add any snow.  

For the evergreens, I showed both children how to dab on the paint with the brush to create the greenery and the importance of mixing three different tones of green to add to their work.

9 year old

I should mention that between each step, the kids used blowdryers to dry the paint.

Now for the next step, I brought out modeling paste and gave each student a palette knife. I then asked them to add all their snow. They had a great time with this part of the project and once again when finished, I asked them to dry the work.

Thankfully each child was finishing the steps at different times, so we didn't have horrible line ups waiting for a turn with the blow dryer.

8 year old

When the modeling paste was dry, they added white paint over all the modeling paste. I showed them how to use a dry brush to add the paint.  Again with the blow dryer! I asked them to make sure everything was good and dry at this point.

I then brought out a glaze and each child made a glaze with white to add over their entire work. This helped blend and soften each work to enhance the winter look of the pieces. And then using a high flow iridescent white mixed with a bit of soft body white, they tapped their paint brush over the work to create falling snow.

"Blizzard Night at the park", 11 year old

Now all was fine and dandy when all the kids added the glaze until the above work gave very unexpected results. The glaze did not dry the way expected on this work and was not in anyway what the artist was expecting. However he was quite excited by the surprise and was very happy when what had been just a dark winter night at the park turned into a blustery winter storm in the park. Isn't is great? I almost feel like I need to pull down my toque, wrap my scarf up to my nose, and hunch down into my winter coat while viewing this work.

The two hours went by quickly. The kids were all excited to share their works with their parents when they arrived for pick up. Some works will be going home and finding a place on the wall, while others are being wrapped up and given as gifts to relatives.

It was a wonderful afternoon to start getting into the holiday spirit of making and giving and today, I have high hopes of seeing some actual snow on the ground instead of just in these beautiful paintings.


holiday card workshop

This Sunday, I will be offering a workshop where the children will be carving their own stamps to create holiday cards.  Each child will go home with one print for framing plus cards and envelops to send out during the holidays. The stamps can be used for many years to come at home also. Sign up through KudzuStudio.com. 

The workshop runs from 2-4:30pm and is appropriate for ages 6 and up with a small class size for one on one attention. Cost is $60.00 and includes all materials.

holiday paper house workshop

Sunday, December 6 from 10-12pm, I will be running a workshop to create holiday paper houses inspired by the old German ones I have collected over the years. I am so excited to share this project with the children. Kids will even be able to add a battery operated votive to the back to create a warm glow through the tissued windows! There is only three spots left so if you are interested, sign up quickly at KudzuStudio.com. Cost including all materials is $55.00.