Showing posts with label gelatin print art lesson. Show all posts

Friday, March 4, 2016

gelatin printmaking workshop for children

This past weekend I ran a gelatin printmaking workshop for the North Vancouver Community Arts Council.  I ran one for children and one for adults. What is wonderful about this medium is that I could do the same projects for both groups, gelatin printmaking is easily accessible regardless of age.

I did three different projects with the children in order to give them a real sense of all the different types of monoprinting that could be done on the plates.  Although there are many other ways to use the plates, these three projects gave a nice variety within the two hour time frame.

They started the day by doing a layering print using a masking stencil they created themselves.


First I had them create three circles of different sizes. I told them the more unusual the circle shape the better! Then we chose three different inks, light to dark color, and began the first pull using the lightest color.


I had some materials on hand for them to use for stamping into the ink, then we used the circles to create "flowers" adding some string to create stems. They had two pieces of paper. The first to pull the original print and then a second to pull the ghost print. They used the same two pieces of paper for all three pulls, creating a layered monoprint.


This boy was thrilled with his print, he thought it looked like an alien! I suggested that he draw into the print later to bring out the details of the creature. I have to admit, I see E.T. too.


Here is an example of the ghost print.


They loved creating these prints and caught on very quickly to the process. So much so, they could hardly wait to see what was next! After I cleaned their plates, I gave each child a piece of cedar I had cut from my back yard. I told them to take a part off that they liked to use to create a nature monoprint.

For this project I had them ink their plate with two different inks at once, green and gold.


Again each child pull two prints, both the positive and negative image.


Then finally I wanted to show them how they could paint on the plate with the inks to create a picture monoprint. I had birds and flowers for reference.

Each print was started by putting the reference material underneath the plate. Because you can see the reference picture, it is easy to create the beginnings of the painting by laying down the darks and lights.


Once those are in and you can't see the picture anymore, they pull out the reference and then continue to add paint until happy with the final picture. Once completed the children were able to pull two prints, the original and hopefully a ghost.

original

ghost

Sometimes the children like their ghost print better than their original, such was the case below.

original

ghost

I lost the kids in this project, in the best way possible. I could not get them to stop creating prints. Some children created three different prints, but all at least finished two. I have tried to highlight at least one print from each child that day. Hopefully I have been successful but things were moving so fast, I'm afraid I am not quite sure who did what in the end. 


I won't try to attempt putting the ages down on the works, but the children ranged in age from 7 to 10 years old.


I love the perspective of this hummingbird getting a drink.


I feel like the above print would make a great wallpaper too.


I believe every child first created a bird and quickly wanted to try their hand at a flower afterwards.


Then most quickly went back and created one more bird or walked around and admired everyone else work laying out to dry.


The kids worked right up until their parents arrived they were having so much fun. I felt bad as the parents were trying to juggle many prints where they ink was still wet! This lovely hummingbird done in the artist favorite color, pink, was pulled as her mother waited for her to leave.

I did not have time to mount the work for the kids, but if I did I would have cut around the print and then mounted it on a piece of card stock to frame.

I would have had each child sign the print right underneath at the right corner in pencil.


What a fun morning this turned out to be and I think each child went away having enjoyed the learning process of each of the three projects. 

Not much more I could ask for than to watch a bunch of very happy kids leave the classroom. For more information on camps and workshops for both adults and children through the arts council, check out their website here


Thursday, January 21, 2016

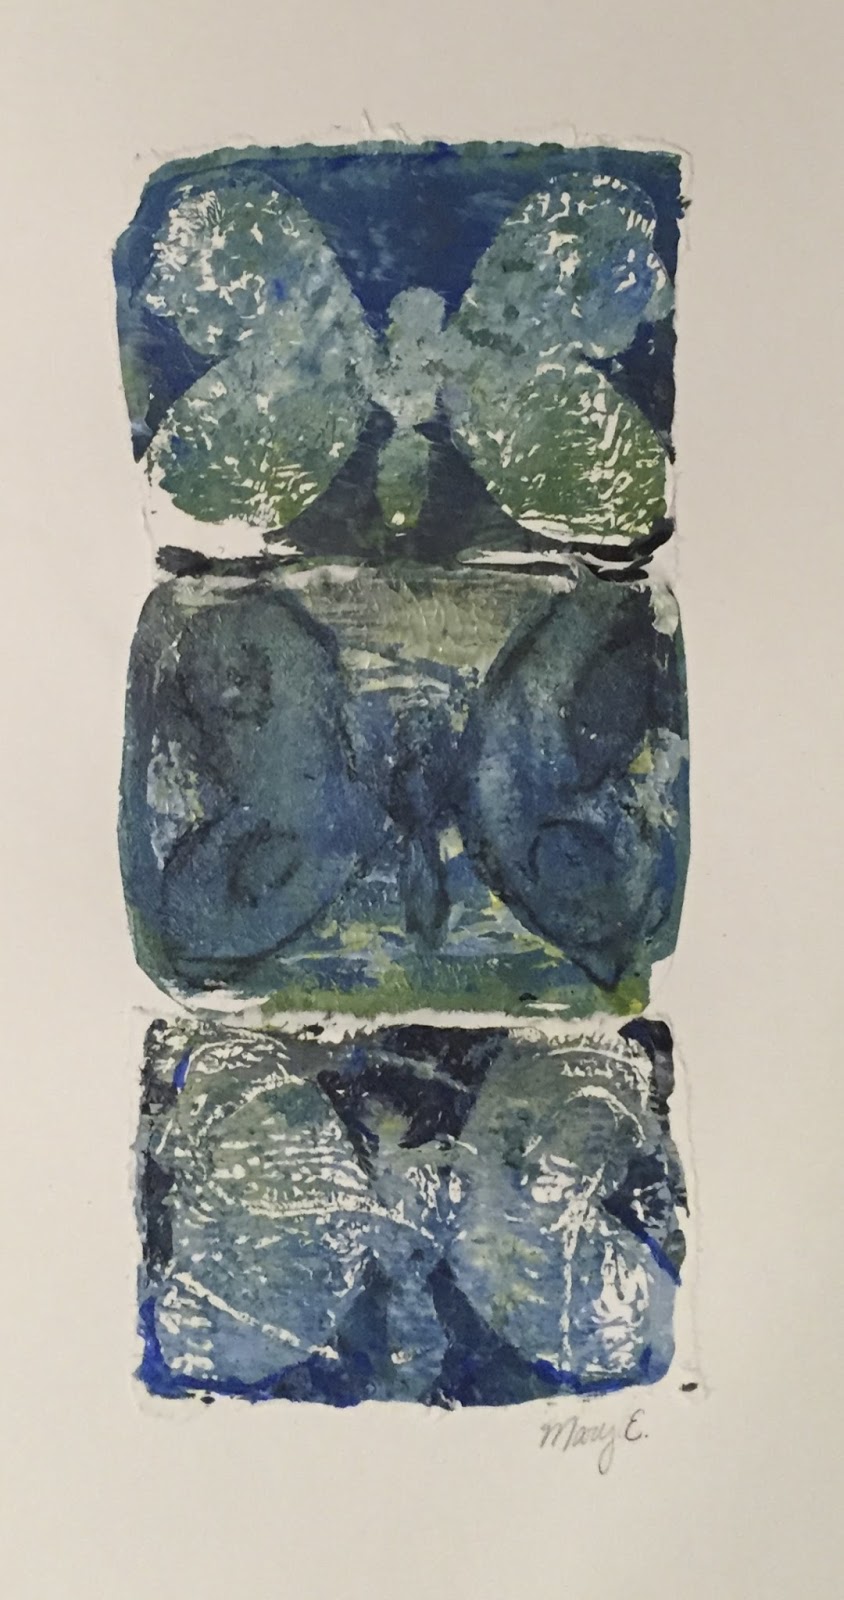
butterfly mono prints on gelatin

There was a birthday party in the studio last night for a 13 year old girl.

After a few discussions with her and her mother, she decided to do a project on gelatin printmaking for her and nine of her friends.

Let me just say, there is not a rock concert in the world that holds a candle to the volume level of a small room filled with ten very happy and excited 13 year olds. I believe my ears might still be ringing.

The girls started off by sketching a butterfly shape on card stock and then cutting it out to use as a stencil.

birthday girl

Then I pulled out the gelatin plates. The girls were fascinated that they were using a jello substance to print on and even asked if they could eat it, which I quickly explained they could not since it also contained glycerine in the mixture.

They first started with a piece of bristol that was cut slightly larger than the gelatin plate. They "inked" the plate with some white, blue and yellow acrylic paint using a brayer, created some texture by stamping into the paint with some bubble wrap and burlap, then pulled a print.

I then asked them to put some blue paint on the burlap and stamp that into the plate, take the same piece of paper and pull another print.

Then using primarily white paint, asked them to once again color the plate, place down their stencil, and using the same piece of paper pull yet another print.


I had also given them two sheets of palette paper, the same size as the bristol. 

(I think freezer paper would work just as well)

Using the non-waxy side of the palette paper, I asked them to pull a ghost print of the leftover paint on the plate.

Now I asked them to use black and blue to paint the plate. They laid down a bit of string and their stencil and now using the the second paper they had made a ghost print on, pulled another print.


Then using the first piece of paper, the bristol, they pulled a ghost print using the leftover ink.

This made some of the girls unhappy, not going to lie. They liked the bristol print they already had and could not understand why they were printing on top of it again.  They were even more unhappy when they pulled the ghost print as they lost a lot of the previous work.

But all was not lost because once again, they added a lot of white to the plate, laid down the string and the stencil and pulled the last and final print on the bristol paper, the first paper they started with and voila! that is the middle print you see on all this artwork.

Happy girls again.


Now with the leftover white ink on the plate, they took the final piece of palette paper and made a ghost print using the non-waxy side of the paper.

Once more laying down blue and black paint, the string and the stencil, they took one final pull using the third paper.

They now had three complete prints of their stencil and a stencil that was barely hanging on in one piece. Thankfully they no longer needed it to complete the project and could throw it away.

At this point, I told them they could go into their work with a small paintbrush and add any details they wanted. I stressed trying to stay loose and use the brush sparingly so they did not loose the essence of the print work they had just finished.


Once done, we gave the tables a quick clean and began mounting the three prints. The idea was the combine them so it looked like one piece. 

The girls first cut the bristol paper to the paint lines using scissors and glued it down in the center of the paper.


I then showed them how they could use the top of the paintbrush dipped in water to "cut" the two palette papers. All you do is create a line with water and then gently pull. This gives a very organic edge to the work, which lets it blend nicely into the bristol paper when pasted on top.


Or not, as this artist decided to do. She wanted all three prints separate and it's good to see the project looks just as nice. I love when students stay true to themselves and in the process teach me something new about a project idea.

Anyway the idea of "cutting" with water and the back of a paintbrush made some girls quite unnerved and so I assured them it was fine to use scissors if they wanted too.


They cut out the last paper, using either scissors or the paintbrush and water, and glued it on top of the bristol paper. For glue, we used just a basic glue stick, nothing fancy.


And once all three pieces were mounted together, each girl had the opportunity to add a bit of charcoal into their butterflies for one last bit of detail.

Then it was time for cake and goodie bags.

And more squealing, giggling, and general noise at a decibel level that would impress any rock band.

The birthday girl had taken the time to make each goodie bag reflect the likes and personality of each friend. Is that not the sweetest? I think it was a great example of the character of girls in the room that night.

I hope they all had fun, I sure enjoyed meeting them.

Happy 13th Birthday Ms. A!! 


Friday, July 31, 2015

nature gelatin prints


While on our hike the first day of the 'Drawing from Nature' art camp, I had each child collect a bag of found objects that would be utilized during the rest of the week.

One of those projects would be for printmaking. 

I made each student a gelatin plate from a recipe I got on Linda Germain's website. Basically I made one large gelatin plate on a cookie sheet and then cut it into eight pieces so each child had one.

These plates should last me about six months if I take care of them properly, which means lots of fun projects ahead!

Starting with a light color, I asked them to roll it on the plate. We used water based Speedball block inks for this project. Each child then took a small leaf or leaves and put them on the plate after rolling on the color.

11 year old, study of positive and negative image with fern leaf

Then they rubbed a piece of Bristol paper over the top and pulled a print of the negative image of the plant.

Then they lifted the leaf/leaves off the plate and put another piece of paper on the plate and rubbed again. This time creating a positive image of the leaf/leaves.

10 year old


Then I had them pick a another color ink slightly darker than the first one plus something from their found objects slightly bigger than the first leaves to repeat the whole process again using the same two papers we had just used to print the first images

10 year old

I asked them to pick up the print with the positive image to use for the first of the second two prints.

Wait. What?! Which is the positive image?!


Did I mention what a great project this is for teaching positive and negative image?

I explained the positive image was the one where you could see the image of the plant, not just the shape. 


I wanted to make sure the second leaf took up more space on the gelatin plate than the first image so that some of the first image showed through the negative space.

6 year old

We then took the paper with the negative image and pulled the positive image off the plate, so now they had two prints layering on each paper. Each paper containing one negative image and one positive image.

Back to the collection bag to pick a large leaf. I suggested this was a great time to pull something like a fern leaf that takes up LOTS of space, but there were lots of other choices made too.

Now I asked them to pick their darkest color to roll over their plates and place down the large leaf.

9 year old

I also told them they could use whichever of the two papers they wanted at this point for the first pull but to remember it would be the negative image.

6 year old


They got some great imagery.  It really didn't matter if they stayed on register, although I had cut the paper not much bigger than the plates in order to make it easier for them to match up the various prints.

At the end, I suggested they each take the leaf that created their favorite image on paper and take a single print, both positive and negative, to keep. By this point, a couple of kids were ready for snack and did not do this but most wanted a single print of their favorite image.

8 year old


9 year old


It's easy to clean the plates up, just take some copy paper and blot it over the plates until no ink pulls up, put them back on the dollar store cookie sheet, cover with plastic wrap, and place back into the refrigerator for next time.

For me, it's hard to choose a favorite among the group of prints collected. The kids excitement level is high during the project and I love watching them get lost in the process of creating prints. 

It always feels like Christmas morning when we do printmaking of any kind in the studio because there is always that element of surprise when you lift the paper from the plate. You never know quite what you are going to get and the studio is usually full of "ooh's and ahh's" and squeals of "look at this one" when they get their first look at the images.

I'm looking forward to doing this project again with the campers at Seymour Art Gallery in August. I'll be running the "Drawing from Nature" camp with the gallery also and I do believe there are a few spaces left if you want your child to join. Just call the gallery to register.

9 year old

9 year old

11 year old

10 year old

10 year old

8 year old
(he put the print on it's side because it looked like a forest)

7 year old


10 year old

9 year old

9 year old

8 year old, pinecone
I did not think this would work at all, but love the ethereal quality of the print!

6 year old

6 year old

6 year old

9 year old

9 year old

9 year old

6 year old

6 year old


8 year old

8 year old

8 year old


8 year old

8 year old