Showing posts with label printmaking with children. Show all posts

Thursday, January 21, 2016

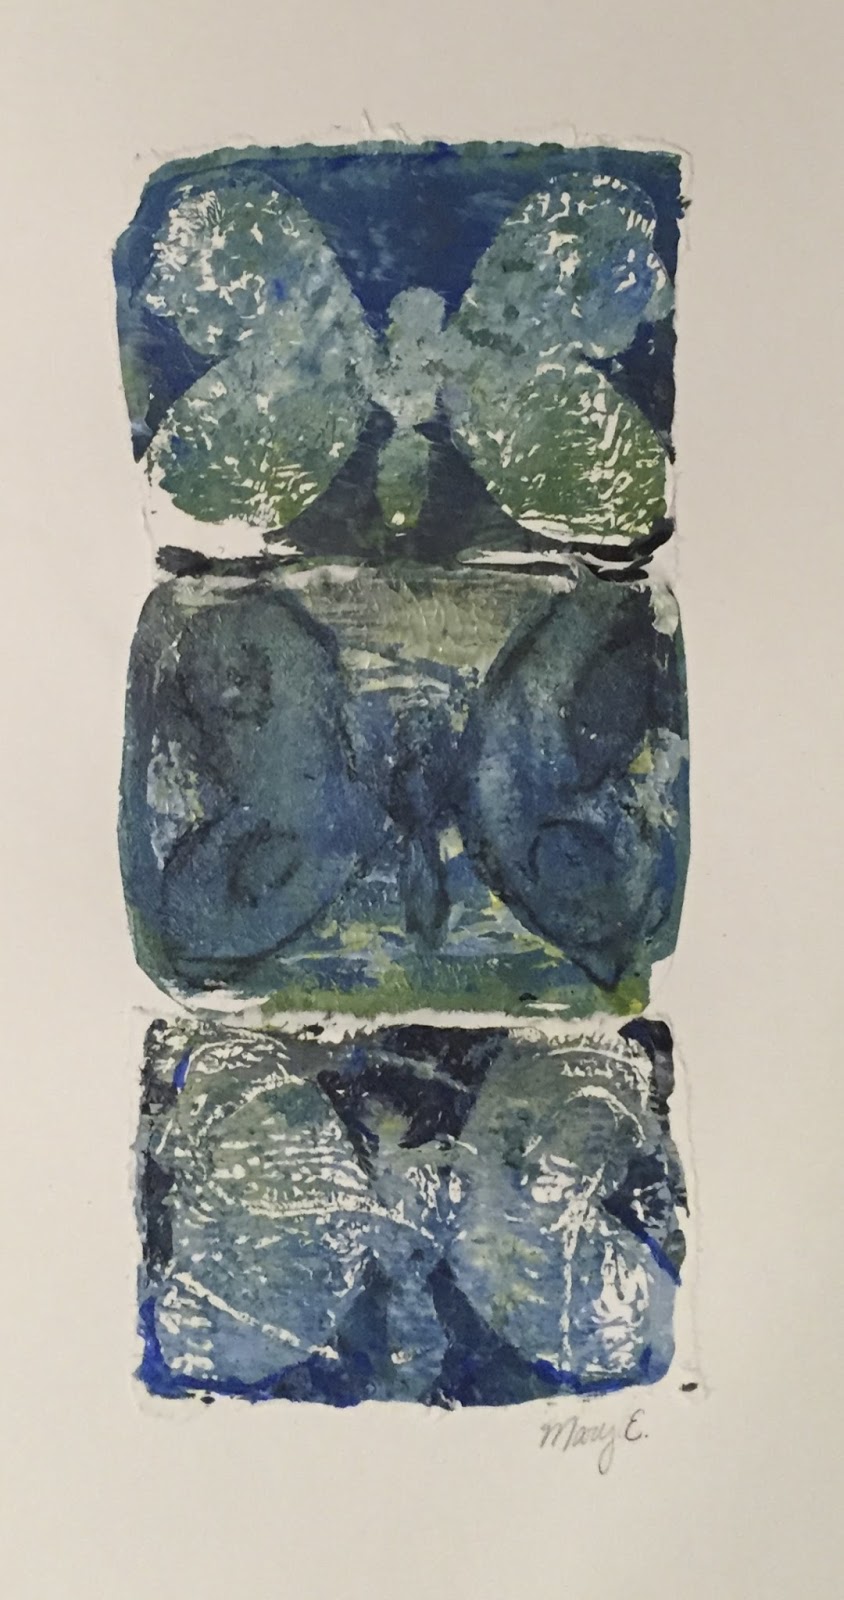
butterfly mono prints on gelatin

There was a birthday party in the studio last night for a 13 year old girl.

After a few discussions with her and her mother, she decided to do a project on gelatin printmaking for her and nine of her friends.

Let me just say, there is not a rock concert in the world that holds a candle to the volume level of a small room filled with ten very happy and excited 13 year olds. I believe my ears might still be ringing.

The girls started off by sketching a butterfly shape on card stock and then cutting it out to use as a stencil.

birthday girl

Then I pulled out the gelatin plates. The girls were fascinated that they were using a jello substance to print on and even asked if they could eat it, which I quickly explained they could not since it also contained glycerine in the mixture.

They first started with a piece of bristol that was cut slightly larger than the gelatin plate. They "inked" the plate with some white, blue and yellow acrylic paint using a brayer, created some texture by stamping into the paint with some bubble wrap and burlap, then pulled a print.

I then asked them to put some blue paint on the burlap and stamp that into the plate, take the same piece of paper and pull another print.

Then using primarily white paint, asked them to once again color the plate, place down their stencil, and using the same piece of paper pull yet another print.


I had also given them two sheets of palette paper, the same size as the bristol. 

(I think freezer paper would work just as well)

Using the non-waxy side of the palette paper, I asked them to pull a ghost print of the leftover paint on the plate.

Now I asked them to use black and blue to paint the plate. They laid down a bit of string and their stencil and now using the the second paper they had made a ghost print on, pulled another print.

Then using the first piece of paper, the bristol, they pulled a ghost print using the leftover ink.

This made some of the girls unhappy, not going to lie. They liked the bristol print they already had and could not understand why they were printing on top of it again.  They were even more unhappy when they pulled the ghost print as they lost a lot of the previous work.

But all was not lost because once again, they added a lot of white to the plate, laid down the string and the stencil and pulled the last and final print on the bristol paper, the first paper they started with and voila! that is the middle print you see on all this artwork.

Happy girls again.


Now with the leftover white ink on the plate, they took the final piece of palette paper and made a ghost print using the non-waxy side of the paper.

Once more laying down blue and black paint, the string and the stencil, they took one final pull using the third paper.

They now had three complete prints of their stencil and a stencil that was barely hanging on in one piece. Thankfully they no longer needed it to complete the project and could throw it away.

At this point, I told them they could go into their work with a small paintbrush and add any details they wanted. I stressed trying to stay loose and use the brush sparingly so they did not loose the essence of the print work they had just finished.


Once done, we gave the tables a quick clean and began mounting the three prints. The idea was the combine them so it looked like one piece. 

The girls first cut the bristol paper to the paint lines using scissors and glued it down in the center of the paper.


I then showed them how they could use the top of the paintbrush dipped in water to "cut" the two palette papers. All you do is create a line with water and then gently pull. This gives a very organic edge to the work, which lets it blend nicely into the bristol paper when pasted on top.


Or not, as this artist decided to do. She wanted all three prints separate and it's good to see the project looks just as nice. I love when students stay true to themselves and in the process teach me something new about a project idea.

Anyway the idea of "cutting" with water and the back of a paintbrush made some girls quite unnerved and so I assured them it was fine to use scissors if they wanted too.


They cut out the last paper, using either scissors or the paintbrush and water, and glued it on top of the bristol paper. For glue, we used just a basic glue stick, nothing fancy.


And once all three pieces were mounted together, each girl had the opportunity to add a bit of charcoal into their butterflies for one last bit of detail.

Then it was time for cake and goodie bags.

And more squealing, giggling, and general noise at a decibel level that would impress any rock band.

The birthday girl had taken the time to make each goodie bag reflect the likes and personality of each friend. Is that not the sweetest? I think it was a great example of the character of girls in the room that night.

I hope they all had fun, I sure enjoyed meeting them.

Happy 13th Birthday Ms. A!! 


Friday, January 15, 2016

animal prints

As the Wednesday class was finishing their flower acrylic project the week before, I asked them if there was anything they might like to do in next week's class.

Without hesitation they remarked, "Printmaking!"

Great.

Then I asked them if there was anything in particular they wanted to use for subject matter and again, they quickly shouted, "Animals!"

So on Wednesday, the class worked on an animal printmaking project.

This is a full class and printmaking can always be a little chaotic at the best of times and unfortunately I am under the weather with a nasty chest cold.

So when coming up with a project, I needed to keep in mind what I felt like I could successfully handle also while meeting the children's request. I decided to keep things simple and have them create lino prints.

Each child created a line drawing of an animal of their choice and transferred it onto a piece of styrofoam. Once complete, they were able to choose from a variety of color choices to ink on the plate (color was decided democratically as a class)

sketches used for transferring onto styrofoam plates

It was a great night. Even the youngest children could complete each stage of the task on their own. As they were finishing up, I asked them to put their two favorite prints on the table for me to mount once dry. I found it interesting which ones they picked vs. which ones I would have picked. I couldn't resist adding a couple of others to mount as I was cleaning up.


8 year old, sea turtle

I think this is a stunning color, she made it herself when inking the plate by combining several of the choices together.  


She has done the same with this purple print and I think she created a sense of viewing the turtle in the sea perfectly!


How darling is this panda bear created by a ten year old? Don't you just want to hug it?


Here's a close up of one of her bears.


I like the way this seven year old artist blocked the color on each side of her animal. 


Each child also started off with doing a print in black and white to make sure they were happy with all their details. If not, they could wash the plate and add some more lines. In many cases, the kids liked their simple black and white prints the best.


I love the thought process used when creating the above artwork. The artist used a reference picture of a dog standing on a chair at the inside window of a house, waiting for it's owner to come home. The artist asked me if she could put the dog in another environment, which I wholeheartedly encouraged her to do.

I absolutely love that this dog seems to be dreaming of becoming a wolf, howling at the moon, reminding every viewer to dream big!

9 year old, dog

Then there is this six year old artist, who I think sketch three of four different animals before finally creating this most adorable panda portrait. I so admired her tenacity and positive attitude as she worked to create an animal she was very happy with.

6 year old, panda portrait

How sweet is this lion cub sunning itself on a hot day in Africa? I like that she emphasized the feeling of heat with her color choices too.

10 year old, lion cub

Oh my goodness, then there is this pug! The composition and the drawing kills me, is it not to die for cute?! Those three little hairs on top of it's head! Very deliberate addition by the artist and it just makes the piece. I love how the dog looks like it is popping it's head up into frame, more than likely wanting a treat and quite indignant it is having to wait for one!

6 year old, pug

It just gets cuter when color is added too.


And finally this horse.


The artist did not pick out the patchwork inking as one of her favorites, but I loved it and couldn't resist adding it to the mix. She was quite proud of this drawing and her final work.

8 year old, horse

So much so that when there were a few minutes left at the end of class waiting for parents, she used some chalk pastels to color in her original sketch.


I have since set the chalk and mounted it for her too. How could I not? She's so proud of it.

This project went off without a hitch, despite me not feeling my best. Each child was able to work on it independently and as able to take complete ownership of their work. And that is a testament to the continued success of this printmaking project, regardless of subject matter.


Friday, November 6, 2015

mixed media birds- acrylic and printmaking

After starting an Instagram account called Kudzu Art Studio, https://instagram.com/kudzuartstudio/,
to share all the amazing works of art being created by the students, I came across an amazing studio in Sidney Australia called, "the kid creative".

If you are on Instagram, have a look here.https://instagram.com/thekidcreative/

There were these amazing mixed media artworks that were so impressive I sent a note asking how they had been created. The instructor graciously wrote back to me and generously shared the techniques she had used to create the works of art.

I could not wait to give this project a try with the students in the Monday class.

Although the original project had used magazine pictures of landscapes, I had the students in my class paint a landscape (or flower) using acrylic paints.

Again, I they were given only primary colors, black, white, and burnt umber. They worked out their composition on the acrylic paper using charcoal.

This was an interesting process for them since the paper was an unusual size at 3.5x12. When they finished their paintings, I handed each student a styrofoam square.

On a piece of copy paper, I asked them to draw a bird using only interesting lines. Then they taped the drawing on top of the styrofoam that I had already taped to the table and traced over their marks.

After making sure they had traced all the lines, the students took off their drawings, retraced over their lines on the styrofoam to make sure they were well indented and then made some prints using white ink on black paper.

11 year old

9 year old

7 year old

After making sure they were all happy with the results of the prints on the black paper, we took another sheet of black paper and glued the acrylic painting they had created to the right side.

They then printed on top of the work, again using the white ink.

The results are stunning!

9 year old

During this project, I learned that the above artist really enjoys landscape painting. He got completely lost in the work and got a beautiful result. He was quite deliberate in the placement of his print as he did not want it to cover up the water that he was so proud of painting.

11 year old

This student started with painting flowers. When it came time to create her bird, she asked if it was OK to do her bird flying. As always, the decisions are always theirs and so I told her to go for it if that is what she wanted to do. I was not sure what the end result would look like since it varied from my vision of the project, but that makes it all the more interesting. In the end, the result was beyond marvelous! Without it being her intention, the bird looks like it is collecting nectar from the flowers. Such a wonderful example of trusting your gut and being courageous enough to just "see what happens". I'm so proud of her and her art.

7 year old

And then there is this little guy. Oh my word, those are a lot of eggs surrounding the bird. She is going to have her hands full when they all hatch! (The first one on the far right has just hatched by the way.)

This artist spent a long time on his painting, paying particular attention to a stair pathway in the forest. However unlike the first artist, he wasn't too concerned about how much of it showed when placing his print on the paper. And so great that he didn't because it actually looks like the branch from his print is connected to the painted tree thanks to his decision on placement.

The students finished these works in a 90 minute class, however left them in the studio to dry. When Tuesday's class came, they were quite taken with them and also wanted to do the project. 

Interestingly though, they only finished the acrylic painting in a 90 minute class. So it goes with the personality make up of different groups of children. I can't wait to share with you their work once it is complete.

I love these works. I'm so excited for the kids as they loved them too. What is even more exciting is that I sent a thank you to the instructor in Australia when I posted these on Instagram. She responded and we are now looking to collaborate together with our students in the future on a work. 

Won't that be a great experience for the kids? Getting to know new friends from the other side of the world through art?  I could not be more excited about the opportunity for myself and my students.

All started by some sweet mixed media works starring birds.


Tuesday, November 3, 2015

spooky etchings without a press

This summer while in Amsterdam, we visited Rembrandt's home.

To be truthful I figured it would be more of a tourist trap and less than inspiring, but my husband and I have been through the museums of Amsterdam a good dozen times so thought something new was in order.

I was so pleasantly surprised by the house, yes, at times it is a bit of a tourist trap but then you get to the second floor where Rembrandt's studio would of been and I could of spent all day there.

And I do mean all day as they had an expert on hand who has studied Rembrandt's traditional ways of mixing paint and was recreating them right in front of you.  His extensive knowledge on Rembrandt's painting techniques and techniques of that period was so impressive and quite interesting.

I have lots of ideas for the high school class on some of the things I learned but this post is about the elementary classes and the project idea I was inspired to try from Rembrandt's house for them.

The house has a huge collection of Rembrandt's etchings. They are quite beautiful and I left Amsterdam wondering how I could present this to the students without a studio press.

And most importantly how to do it at home, should they choose, without breaking the piggy bank.

Using heavy acetate, I cut a square for each child on my cutting board. Then I brought out the scratching tools we use for scratch art, I wasn't sure if it would work, but it worked amazing.

7 year old

I then brought out all my skeleton/mummy reference I have collected from old National Geographic magazines.

Each child choose an image before getting started, like Rembrandt, I asked them to scratch out all the darkest areas first.

8 year old

I then showed them how varying space between the lines would create different value.

10 year old

I think the students found it very relaxing to scratch into the acetate once they realized they didn't have to scratch hard and creating their etching held their attention for much longer than I expected.

9 year old

When finished, we covered the plate in black water-based printing ink and they rubbed off the excess with a paper towel. Then using either cut watercolor or bristol paper, they lightly sprayed some water on the surface of the paper, wiped it off with a clean sponge and laid the wet side of the paper over their plate.

10 year old

Using a clean brayer, they rolled over their plate until they could begin to see the edges of the plate through the paper, pulled the print, and voila!

10 year old

The best part of the project was watching the kids experiment with the printing process.

What happened when they didn't rub off all the ink from the plate?

10 year old

What happened when there was too much water on the paper?  Or not enough?

8 year old

What happened when they put light pressure or heavy pressure when rolling the brayer to make the print?

10 year old

And finally what happened when you printed on watercolor paper vs. bristol paper?

11 year old


It was interesting to see each child work out the results they wanted and some kids had upwards to 25 prints experimenting for their "favorite three".

7 year old

The results have to be some of my all time favorites to come out of the studio.  Yes, they are quite creepy and spooky.  But I loved them so much I asked each child if they would pull a print for me or let me pull a print off their plate when finished so I can frame them to put out in the studio each October.

7 year old

I will have to do the project again later in the year with bunnies or some other cute animal for the parents to make up for the creepiness of these prints.  They are all so beautiful I am going to overwhelm you with pictures in this post.

8 year old

10 year old

There is absolutely no way I could choose just one when the results were this great.

7 year old

I mounted each child's favorite three prints on 4X6 paper.  A couple of children created something a little larger, but for the most part each print mounts nicely on this size.

10 year old


I am so glad we took a chance visit to Rembrandt's house in Amsterdam.  I'll be using this project his house inspired for years to come.