Monday, September 7, 2015

finger painting with acrylics

Last week I had a "Back to School" party in the studio for seven little girls, three 6 year olds, three 8 year olds, and one preschooler.

I decided to introduce a project I did a couple of years ago focused on what else? apples!


First, I explained why the plate of apples was sitting on the floor. I told the girls we would be painting from a bird's eye view perspective.


Then I brought out some work of Cezanne to inspire them. Afterwards, they could either do a working sketch or take a piece of charcoal and draw directly onto the acrylic paper. 


When everyone was happy with their composition, I gave each girl a palette of the three primary colors, black, white, and brown. However there were no paint brushes. I explained we would be using our index finger instead. Although if a child could absolutely not stand getting their finger covered in paint, I would hand them a paintbrush instead. I am happy to say that each girl gave painting with their finger a try although a couple of them then asked to finish with a paint brush.


When painting with their finger, I find it does a great job of keeping the style loose and most importantly really helps emphasize using brush strokes as a tool to create an interesting painting.


The girls also did all their color mixing directly on the paper which went a long way to creating some incredible work. I asked them to all start with their background, then work on their plates, and finally to paint their apples.


I also brought out a color wheel and went over how to use complimentary color to create shadow instead of black.


When they were finished, I gave each girl the charcoal one last time.  I showed them Cezanne's work again and asked them to pay attention to his use of black line. Then they had the opportunity to use the charcoal wherever they felt it should be added to their work.


As the mother was taking a group picture of the girls with their finished artwork, I mentioned to one of the other adults there for pick up how amazed I always am at the variety of work from one set of instructions. I love the way each girl was inspired by Cezanne's work and how they worked out the project instructions to appeal to their aesthetic. What a wonderful way to kick off a new school year.


I will be taking a short break at the studio after a very exciting summer. Don't forget to check out the school year art schedules at KudzuStudio.com. Classes will start the first week of October and I am so excited about the project ideas. There is something for every age group and I'll be introducing some adult workshops and holiday workshops at the end of September too. Be sure to check it out.

Saturday, September 5, 2015

Gelatin Nature Prints

I had made these gelatin plates for a project a couple of weeks earlier. They are worth the effort to make and will last approximately 6 months if I take care of them properly.  

I can create a lot of printing projects over the next 6 months taking advantage of having these plates on hand!

The kids in the Drawing from Nature camp at Seymour Art Gallery created two different types of prints. First a simple positive and negative image of a leaf or feather they found interesting. The composition could be one simple item or several items, it was up to them.


Then they created a multiple image using three different inks that represented Deep Cove, where the gallery is located.


Hope you enjoy them as much as they did creating them.


Friday, September 4, 2015

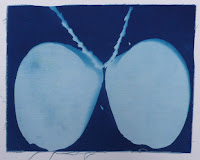
Nature Sunprints

Sun prints have always been a huge hit whenever I have done them with children.

The sheer joy kids find in the discovery, the experimentation, and the outcome never ceases to amaze me with this medium.

I knew it would be a perfect project to do in the "Drawing from Nature" camp at Seymour Art Gallery.

The only problem is that in the northwest, sun can be a bit of a crap shoot and although I have done this project years ago in the middle of winter with very little sun, it takes FOREVER for the prints to finish. You really do want the sun to be shining strong so the kids do not get too impatient waiting for the prints to be ready.

Although not great for our water situation, lucky for us this summer has been unusually sunny and dry. So I knew we were in for a perfect day to do sun prints.

I put all the items the kids had collected on Monday's hike into one communal pile.

Knowing the kids would want to do several prints once they started, I cut the sun paper into fourths in order to keep the project cost effective and allow the kids the opportunity to have fun with the medium until their hearts content.

And fun they had!

The process is quite simple.

First, I had the kids create a small composition using the items collected. When they were happy, I gave them a piece of sun paper or in our case, sun fabric.

At this point, I stress how important it is to get their pieces quickly onto the paper as it is quite sensitive to light. Then they carefully took it out to the deck and placed it into the bright sunshine.

Then they waited for about five minutes for the paper to change colors.

Some kids wanted to move things once it was out in the sun, but quickly learned that does not work. Once it is down, it can't be moved. A good lesson in learning to live with decisions and being quite thoughtful in the decisions one makes since there isn't a "do over".

Once the paper turned colors, they took off the items and placed the paper (fabric) into a shallow bowl of water.

Oh the excitement as the paper changed and they saw the final results.

Needless to say, there was a frenzy of activity as they created multiple prints. It was fun to watch them share results among each other and ultimately be inspired by each other throughout the process.

We had butterflies made from shells.


And some kids used sticks and shells to create the initials of their names.


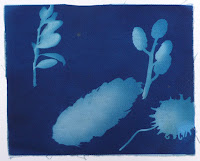
Of course everyone tried just some arrangements of different natural items just to see what would happen. How great are these sea pods?!! 


I wasn't the only one who thought they were great either. Several kids couldn't wait to add them to their compositions after seeing the above results.


And how beautiful are these simple prints of a fern leaf?


Or these sea pods that look like part of an intergalactic composition?

There was a wide variety of compositions using all the natural elements on hand.


Even those prints that might of been "mistakes" turned out lovely. The feather was not exposed long enough and the shells are the learning example of not moving items once the sun process has begun, although it might be a good example of why you should move items in the middle of the printing process too since the result is quite interesting.


I think it is safe to say that the kids really enjoyed this project. One might even say they loved it. 


I'm sure come next summer on a lovely, sunny day, I'll be introducing this project again. Who could resist a project that brings so much joy to the kids participating? Certainly not me.


Tuesday, September 1, 2015

large watercolors inspired by Georgia O'Keeffe

During the hike at the Drawing from Nature camp through Seymour Art, the kids spent time collecting a variety of nature's treasures. 

It could be anything they found interesting.

There was quite a variety of items when we got back to the gallery, leaves, shells, pinecones and feathers just to name a few. There would of been a dead jelly fish amongst the list, but I drew the line at jelly fish coming back to the gallery.

Crazy, I know. 

maple leaf, 11 year old

Before starting this project, I showed the students Georgia O'Keeffe's flower paintings. We discussed why she chose to paint them so large. I also pointed out how abstract some of the flowers became by enlarging the flower so much only a small part was visible.

seashell,  11 year old

I then asked each student to go through their bag and find an item they wanted to enlarge and highlight in their artwork. An item they wanted the viewer to stop and notice in a new and interesting way, something they more than likely usually just walked by and didn't pay much attention to in the past.

fern leaf, 6 year old
I also let them know that they did not need to draw this realistically. I encouraged them to create their own unique style while paying attention to the details of the item in front of them. I also explained that they could use any colors they wanted for painting. I quickly went over how they could exaggerate the colors they already saw in the item or use color to create a certain mood. I wanted them to understand they had lots of artistic decisions, all of which should be made to please none other than themselves.

bird's eye view of pinecone, 11 year old

Since the paper was so large, the kids worked out their drawings directly on the final paper. I showed them how if they drew very lightly with the pencil, they could easily erase any unwanted lines without any trace being left on the paper of their existence. I find by drawing one line dark and one very light, then using the eraser and allowing the kids to visual see the difference, is really the only explanation needed to convince them to keep the lines barely visible while creating a sketch.

I also asked them to have their item touch at least three sides of the paper in hopes of encouraging them to draw big.

sea pods, 8 year old

When they were happy with their sketches, they went over their pencil lines with a permanent black marker.


sea pods, 7 year old

Then I gathered them around and show them a variety of things they could do with liquid watercolor. When you look at all these paintings, keep in mind the children were only given red, yellow and blue color. I am always so impressed with the color mixing they do when using this medium and for the most part, they do all the color mixing directly on the paper.

sea shell, 6 year old

Some of the techniques I showed them with the liquid watercolor before they started their paintings was wet on wet, blooming, salt, blotting, and scratching. And as usual, wet on wet and salt got the biggest response of "oooo's" and "ahhhh's".

By the time I was finished with the demonstration, they could not wait to get started.

barnacles on a shell, 7 year old

As always, I asked them to start with their backgrounds first. This is truly like putting kids in front of a Christmas tree with piles a wrapped presents underneath and asking them to wait for Christmas morning, the anticipation of waiting to paint the hero of the work is killer.

ferns, 11 year old

But the students also realize the reward is sweet. It is always easier to paint over the background with great results than painstakingly trying put the background in behind the focus of the artwork.

ferns, 11 year old

The kids had a lot of fun creating these works. The room got very quiet as they got lost in the process of working with the watercolors. Having the opportunity, (thanks to the Curator), to work on such large paper was a very big treat. And in the end, the kids were all so proud of these pieces.

maple leaves, 7 year old

Like Georgia O'Keeffe, I think they truly loved having the opportunity to make viewers take a second look at the many beautiful things we take for granted that nature provides.