Saturday, April 30, 2016

shadow boxes

I have run a couple of different projects using boxes of late. I picked these wooden boxes up at the local craft store for under a dollar each and with an additional 20% off coupon for the entire purchase, they became an affordable option to buy in bulk for projects in the studio.

I used all the projects as a good example of creating background, mid-ground and foreground.

I first used the boxes with the Wednesday elementary class where the girls created "affirmation boxes".

10 year old

We discussed filling our heads with positive messages and to think about a message they felt was important to remind themselves of each day. I told them they could create whatever imagery they wanted to go with their message.

6 year old

We were having record breaking heat for Vancouver during this class and it seems ice cream was front and center on all the girls' minds because every single one of them focused on ice cream cones. I have no explanation for this whatsoever as I really left the project open ended as to what they put into their boxes.

6 year old

The six year olds are BFF's in class, so I'm not surprised to see them doing the same thing, but the two older girls surprised me with also focusing in on the cones.

9 year old

All I can say is that this ice cream cone was just so awesome when created that every other girl was inspired to create an awesome cone too.

red monkey, 5 year old

The elementary class had so much fun building their boxes, I next create a project for the 4-5 year old class using animals....because what 4-5 year old doesn't like animals?!

All of the above projects were created with acrylic paints on acrylic paper.  The back of the boxes were first painted with the backgrounds directly on the box. (I put masking tape on the front so they didn't get paint on them) Then the animals were drawn, painted and cut out. 

They kids adhered them inside the boxes with these round circle things that had adhesive on both sides. I have no idea what they are called, so round adhesive circle things is what you get.

horse, 4 year old

The children then created some paper pieces to create a foreground. These were glued directly on the front of the box or again added with those round adhesive things if they were going inside (this time stacking two round circle things together so it stuck out in front of the mid ground).

Finally I ran a morning workshop on a professional day at school, kids get the day off so teachers can plan. For this project, I shared a large photo book on the history of the circus. The boys were quite fascinated by some of the pictures from the 1920's, 30's, and 40's- especially the Side Shows. After we had looked at the book far longer than I had anticipated, lots of discussion on what was culturally appropriate in times past that would not be appropriate today, each boy picked something that was particularly interesting to them to create a circus montage.

dancing bear balancing on ball, 9 year old

The only thing different about this project is that instead of paper for the main imagery, the boys used oven baked clay and then painted it once cooled.  They had a lot of fun creating these boxes, so much fun they used up 2.5 hours of the workshop! I was not expecting it to take that long at all.

man monkey smoking pipe, 9 year old

This box was inspired by a sideshow poster the artist saw in the book called "Darwin's Missing Link", the Man Monkey. The piece 'evolved' a bit as the artist did not deem it necessary anymore to include Darwin in the piece. Sorry Darwin, evolution....

And finally this work was inspired by the circus book and the new studio pet, ParaPete the Parakeet. Except now he's PiratePete the Parakeet!

PiratePete the Parakeet, 8 year old

ParaPete looks pretty fancy sporting an eyepatch. He'd probably enjoy a stint as a pirate.

I have a few boxes left and a few new projects in mind. The kids have had a great time working within the confines of the box and they were a great purchase for the studio, exemplified by the several different projects shown here! 

If you happen across some of them while trolling the aisles of your local craft store, give them a go! I don't think you or your kids will be disappointed.


Friday, April 29, 2016

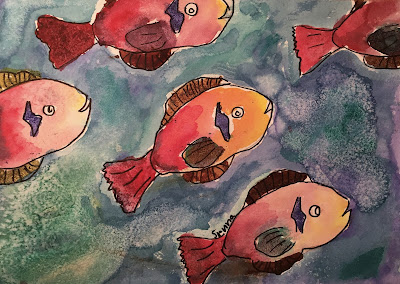
tropical fish using french dyes

These beautiful fish were created by the Wednesday elementary age class using french dyes.

6 year old

The class picked a tropical fish from the reference folder that caught their fancy and then worked out a sketch of just the fish using copy paper. I encouraged them to draw large.

I find that by letting kids work out their drawings on "throw away" paper improves their drawings significantly since it removes the fear of "ruining" the good paper. It also gets rid of the need of erasers since kids can use a window or light box to retrace all the great things about a drawing and then focus on just the few things they feel are not working in the sketch. Once the girls liked their contour line drawing, they used carbon paper to trace it onto the very large watercolor paper and then went over the lines with permanent black pen.

8 year old

Some of the girls repeated their single fish drawing several times when creating their final composition.

6 year old

Each girl started with three colors of their choosing for the background. They applied the dye with a wet on wet technique, carefully making sure not to get water on the fish. This helped keep the dye from moving onto the fish. Some of the girls tried a blotting technique while the background was wet to add coral or seaweed, others added salt for interest, and some did both.

10 year old

The paper was so large that by the time they completed the background it was dry enough to start the fish. Then once the fist were completed, the girls could go back into the background on the areas they blotted to add coral or seaweed.

9 year old

I am amazed at the final work produced by the girls. It's so impressive. The tropical fish were a perfect choice for the girls to use for exploring french dyes on paper. They seemed to love the process and exploring what the dyes would do on their works and in the end were so pleased with what they had created from a simple contour drawing.


Thursday, April 28, 2016

color blending and shrinky dinks

Any project that involves Shrinky Dinks is a hit.

What are Shrinky Dinks? A paper that when put in the oven shrinks down to half it's size!

The holy grail of capturing kids excitement in the art studio as far as I'm concerned. I can't blame them, I loved them when I was little too.

I found this project idea on Dick Blick's website under their lesson plans. I had held onto it for quite awhile and decided to give it a try with an elementary class full of boys.

I started the project by showing them several artist from the Impressionist movement, focusing in on optical blending and asking them to pay attention on how the artists placed colors close together to create their art.

Then I had them each pick a photo from the reference file to place under their Shrinky Dink paper and give it a try with markers, working hard to place two colors next to each other instead of blending them together.

Shipwreck, 9 year old

What's great is that while large, they can see the colors next to each other but then when it has been shrunk, they can really grasp the concept of the blending as the colors come together when very small.

ballerina, 7 year old

But I am not kidding myself here, the highlight of the night was peeking into the oven while these papers baked. They bubble and curl before straightening back out at a much smaller size....or in the case of one poor child, just curl.

Make sure they are doing their artwork on the correct side of the paper as directed by the instructions....it matters.  Art teacher fail but luckily the child was quite easygoing and open to creating another artwork to try again. Needless to say, we made sure we followed the directions to the "t" the next time.

shark, 8 year old

When they were baked, I let the kids take a gold pen and color the edges if they wanted to frame the work. Only one decided to take me up on that offer, the ballerina.


I mounted the Shrinky Dink on a small piece of card stock and then put them on these small easels I had found at the art supply store.


I thought they were pretty cute.


If you look up the project on the Dick Blick site, you will see they used chalk pastel. When I tested the project prior to introducing it in class, this worked really well. However it was not very successful with the kids, which is why I quickly changed over to the permanent markers I have in the studio.  

snorkel diver, 9 year old (pastel)

On all accounts, the kids had a great time creating their artwork. Even when the work curled up on itself and was ruined. As each child finished a work, EVERYONE went to the oven to watch it shrink. And then everyone 'oohed' and 'aahhed' over the finished work as it came out of the oven, which was a great confidence boost for each artist.

The kids left the studio happy and singing my praises as my gramps use to say after a particularly satisfying piece of blueberry pie,"now that's living", because life doesn't get any better than a moment full of happiness.


Wednesday, April 27, 2016

summer camps registration is open!

Camps are set at the studio and registration is open. I could not be more excited for everything I have planned to do with the kids and thought I would share with you a few of the fun ideas.

All the camps run from 9-12pm and hold a maximum of eight children, so I can ensure quality one on one time with each of them. They are appropriate for ages 5 and up and each cost $125.00. The fees include all materials. If a camp proves to be extremely popular with a waitlist, I will look at opening an afternoon session for that week.

ARTISTIC NATURE CAMP, July 4th-10th


This has to be one of the most popular camps I have ever run at the studio and am so lucky Lynn Canyon Trail is a very short walk from here. Last year the kids spent the first day of camp in the woods sketching and having fun.


They then took their sketches back to the studio and used them to create art for the rest of the week. The kids loved drawing in the woods so much that this summer I want to make sure they spend more time in them and so we will actually do some plein air painting in both acrylic and watercolor while in the woods on multiple days. They'll also have a chance to create some great rock sculptures to leave behind for others to discover and enjoy.


Throughout the week, they'll also make their own inks to use for artwork from natural materials while also trying out printmaking and other interesting techniques in studio inspired by walks in the woods.

Pets-n-Art, July 11th-15th

In the past children's pets have been a common theme in their artwork, so it seemed natural to create a week's camp inspired by them. Those children who do not have a pet at home can either use for inspiration a pet they hope to one day own, a favorite "pet" stuffed animal, or the studio's very own pet bird, ParaPete the Parakeet!


Children will create artwork inspired by their pets on plaster and in clay. They will do watercolors and acrylics, even printmaking. We'll finish the week creating an artwork on silk, always a big hit in the studio!


Having watched how excited kids get creating all sorts of art on their pets, I have no doubt a whole week of projects inspired by these beloved creatures will be a lots of fun for everyone.

Birds of a Feather, July 25th-29th


Kids have created A LOT of birds with me over the years and nine times out of ten, if I ask them what they want to draw, it will be a bird. And so planning a week around our fine feathered friends was not a stretch. 


Along with acrylics and pastels, children will have a chance to create birds inspired by First Nation artists, cute little watercolor birdhouses, gelatin monoprints, pastels, mixed media, and so much more.


It was hard editing down pictures to share there are so many fun things the kids will get to try during the week inspired by birds.

Storybook Wonders, August 15th-19th

I have been wanting to run this camp for quite some time and am so excited to finally offer it. Kids always like seeing how art can be applied to "grown up jobs".  I know kids will be fascinated to discover they have been admiring working artist since they were infants while reading picture books. So many times we feel like we have to go to museums to look at "real art" and it's exciting to realize real art has been within easy reach all along within the pages of storybooks.

The kids will spend a morning submerged in a "paper factory", creating their own mass of papers in a variety of colors and textures to share the next day to create Eric Carle inspired collages. We'll look at illustrators of modern day storybooks and the classics to inspire our many works of art in printmaking, watercolor, pastel, and acrylic. 


The kids will even have the opportunity to take one of Dr. Seuss's nonsensical descriptive passages to create their own imaginative tizzled-topped tufted Mazurkas. I have no doubt this week is going to be a lot of fun!

There are several other camps I will be offering this summer and you can find more information about at KudzuStudio.com  


Fairies, animals, and puppets are also going to be explored throughout the months of July and August, so there is lots to choose from. 

In the past due to the camps small sizes, I have found they fill up quickly and will do my best to accommodate each family. All the camps are rooted in fine art principles and are fused with contemporary trends. However the main focus is on children having fun, trying new things, and leaving the studio feeling confident and proud in their abilities to share with others their own unique visual expressions of the world around them.

Look forward to seeing all of you this summer!!


Tuesday, April 26, 2016

blind contour self portraits

In March I had the honor of being asked to work with Seymour Art Gallery in Deep Cove on an outreach program they were running with Hollyburn Family Services. Together we created a project we thought the group would find engaging, blind contour self portraits.

A group of young adults showed up at the gallery where the curator gave them a guided tour, then we all sat down in front of some two sided mirrors I had brought and had some fun.


We started by just experimenting with the process using a pencil in hopes of getting everyone comfortable, but what I discovered was there was no need. There were some amazing sketches that were just stunning!


I was so excited by some of the pencil sketches, but even more excited at how quickly everyone embraced this technique and were having fun! One young man, who likes to draw comics, was so taken with his creations that he mentioned he might use this form of drawing in his new works.


I couldn't ask for much more than that kind of endorsement!


Here's a few more of their "practice" sketches which turned out to be lovely finished works in themselves. Supplies for this are so simple, a paper plate with a hole in the middle to stick the drawing tool of your choice through and a mirror. The only instruction I give them is to not lift up their pencil while drawing.


The first ones they did in pencil and then we started working with a permanent marker.


Aren't they fascinating? 

I then gave each of them a water-soluble pencil and a piece of watercolor paper. Once again they did a self portrait drawing using the paper plate with the pencil stuck through it (so they couldn't cheat and look) and studied their reflection in the mirror.


I then put out some liquid watercolors so they could fill in some of the shapes within the image they created.


I love how each persons unique personality is conveyed on the paper. And it was wonderful to be part of the camaraderie in the room. It was a very special group of young people to get to share some time with .


I was completely taken with this particular work where they artist added some words. How poetic, "this is me. in life. with love."


I would love to see some of these compositions explored in larger works. There was lots of laughter and talking while artists created their works and the time went very quickly. 


Some artists completed more than one work they enjoyed it so much and before we knew it, time was up! And no one was really ready to leave. Thanks to the supportive curator at the gallery, they didn't have too and everyone ended up staying another half hour after we were suppose to be finished.


There were some gifted young people in this group. Artists who I hope continue to pursue their obvious talents. It was a truly enjoyable couple of hours spent at the gallery and I hope to have the opportunity to work with them again in the future.


We had covered the tables in butcher paper to protect them from paint and one artist left this "doodle" behind. I asked her if she wanted it and she shrugged but I was so taken with it, I asked if it was OK if I kept it and she agreed. 

It now hangs in my studio on the wall. A lovely keepsake for me to remember some remarkable young adults I was lucky enough to work with for an afternoon.