Sunday, July 31, 2016

green man collographs

During the Realm of the Faye art camp, I tried to introduce many different forms of folklore to the kids. With one boy in the class, I needed to make sure the week wasn't focused on just pretty princess fairies. Plus I wanted to have all the children leave with a sense of just how many marvelous different characters existed in the fairy realm of make believe.

One of the more interesting things I learned while researching all things fairy was the Green Man. I can now hardly wait to go to Europe this fall and keep my eye open for him image in the architecture throughout the ages.


His face is covered in foliage and he is seen as a symbol of rebirth, representing the cycle of regrowth each spring. I was amazed at the many different cultures throughout the ages who embraced this image, including images from modern day, and shared lots of different images with the kids of the Green Man.

They were equally fascinated.

I thought the graphic nature of the Green Man in architecture would be easy for the kids to interpret in printmaking. I decided to introduce a collograph project since I had so many young children in the camp.

7 year old

I started by taking some of the cardboard I always save from the back of the paper pads I buy for classes. I cut them into 4x4 squares and covering them in matte medium, giving the the opportunity to dry completely before camp started.

6 year old

The kids then spent the morning cutting shapes out of card stock and gluing them onto the cardboard. I showed them how to layer paper on top of paper to create depth to the work. They truly enjoyed this process and spent far more time than I anticipated creating their faces.

9 year old

As they began to finish, I brought out some yarn for them to add if they wanted to the works. Then in the afternoon after the kids were gone, I again covered the artworks in another layer of matte medium so it would dry before we printed with them the next day.

5 year old

I brought out green, black and gold ink for the kids to use for printmaking. Some kids did not want to print their work in black and went straight to the green. I explained to all of them that they would need to do two or three prints at first just to prime the plate before they would get a really nice one.

7 year old


Lots of discoveries were made while creating the prints. How much ink, how much pressure, how much water to add to get a nice result. While this held the interest of the older children in the camp, my observation with the younger ones was that they enjoyed creating the plates far more than they did printing with them.


6 year old

That being said, I think the Green Man had a lasting effect on the kids as you will see in tomorrow's post. It was interesting to try a different form of printmaking with the kids than I usually do and I will be anxious to take what I learned from my observations watching the children explore the process and apply it to future projects. 


Saturday, July 30, 2016

fairy and gnome watercolors

In the Realm of the Faye art camp, the kids applied the fairies they created for the Cottingley fairy project into watercolor paintings. It seemed a shame to not create some way to display the very cute fairies and gnome they had made.

So each of them created a background in watercolor of where their magical beings lived.

9 year old

I showed them  several techniques they could try with the watercolors and as usual, the salt was a big favorite. 

6 year old

I gave each child a water soluble pencil to draw their background first and then just primary colors to create their paintings. They always enjoy exploring how to create different colors with the paints and always rise to the challenge of creating brown! Definitely the most challenging of colors to make for young children and they are always quite proud of themselves when they accomplish creating it.

7 year old

Love the way the above to children used the salt to create fairy dust in their paintings.

When the backgrounds were finished and dry, I had each child take their fairy (or gnome) and decide where into the works they would want them positioned. And then I applied a matte medium to the back of them and on the sides to make sure they were adhered to the paper.

5 year old

I love the way the finished works look with the kids gluing the fairies down after painting the background. 

7 year old

The kids seemed to love it too as they admired their finished works and the memories they held of lots of fun in the woods the day before and now displayed in beautiful pieces of art.


Friday, July 29, 2016

cottingley inspired fairies

This has to be one of the cutest projects I have ever done with children. It took on a life of it's own that only children can bring to the table.

One of the summer camp themes was focused on fairies and other folklore surrounding magical creatures. While researching project ideas, I decided to create one around the Cottingley Fairies, some photographs that have intrigued me since I was young.


I figured the children would enjoy the story surrounding these very famous pictures created by some mischievous girls who just wanted to play in the creek, much to their mothers' chagrin.

The children started by creating their own fairies using a heavy watercolor paper and liquid watercolor. I kept reminding them that it was important they keep arms, hair, and wands close to the body or not make them too thin in order to make sure things wouldn't break off once cut out.


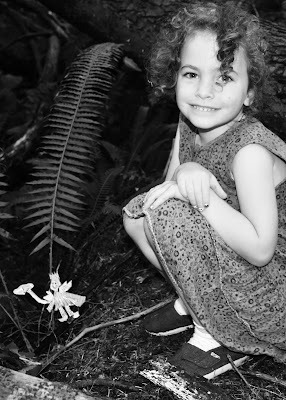
We then took the fairies and a lone gnome to the woods to create our own fairy pictures. And this is when something magical happened with the children, like only kids can do, their imaginations took over and the fairies and little gnome seemed to really come to life as they composed and then sat for their pictures.


Fairies were fluttering amongst the tree branches as a little girl said hello. A young girl I might add who took composing this photo very seriously in hopes her picture would become just as famous as those of the young girls in Cottingley a hundred years ago.


A boy stopped to have a conversation with a gnome that happened to be walking by.


He had such a good time setting up several other photos of the gnome we had happenstance upon in the woods.


Fairies were hiding in the ferns.


And sneaking up on children to sprinkle a bit of magic dust on them.


The fairies were even sharing huckleberries with the kids.


Fairies became best friends with girls who were best friends and posed for one last requested photo together before it was time to leave the woods.


And they seemed sad to see it was time for us to leave and go back to the studio at the end of the morning, following us out of the woods. 

What a special morning we spent in the woods.

What a really humbling morning it was for me to get to be apart of the imaginative and magical world  only children can create. An amazing reminder of just how lucky I am to get to do this job for a living.


Thursday, July 28, 2016

pet oil pastels

As we came to the end of the week of the Pets-n-Art summer camp, I decided to do something a little different. All week long the kids had been using some print outs from the computer of their pet photographs for reference.

Why not use them again to create oil pastels?

And when I say use them, I mean literally use them.

Violet.  10 year old

Starting with the black and white print outs of their pets, each child began to add the oil pastel on top.

Aussie. 7 year old

Aussie. 5 year old


Some kids decided to use "crazy colors" on their pets and in the above picture, I took a moment to explain complimentary colors as an option for their work. Unlike my own kids, this child listened to me in the end and gave it a try. Although as I have said before, I always stress to the kids that my suggestions are just that, suggestions, and they are free to decide whether or not they use them.

Colby. 5 year old

As they started their works, I asked them to pay attention to the different directions the lines on the fur of their pets moved and try to make their drawing strokes follow the same direction. 

Sandy. 9 year old

And as usual, I stressed for them to add more than one layer of color to blend and make their own unique color palette on the paper.

Parapete. 4.5 yerra old

Parapete. 8 year old

Parapete. 7 year old


I had printed off some pictures of the studio bird, Parapete the Parakeet, also because he had been such a big hit with the kids all week. A couple of kids were quite excited to use the pictures to create their artwork. I love how each child made the same picture their own.

Duffy. 9 year old

They seemed to really enjoy working on this project. And I think they found it interesting to see that although they were working directly on a photo of their pet, as they began to add their marks the work became an original piece instead of just "copying".

Q-Bert. 7 year old

I even found a picture of Q-Bert on google to print out. How could I not? Every single project for this child had centered on the character, it seemed like a crime if this project didn't too.

Fiddy. 9 year old

Although I had printed out a couple of extra pictures of his family dog for him in case he wanted to use it for this project like his older brother. Not surprising, he declined. But how cute is Fiddy as a puppy sitting under the table?! 

Pushka. 5 year old

I was quite happy in the end with this project. Not because I was happy with the final results, which I was, but because it was a great lesson for the kids to see the importance of line direction in their works of art. Something I am always stressing whenever they are painting or drawing but a concept that is not always easy to grasp.

Krystal. 7 year old

However with this project, by george they got it.


Wednesday, July 27, 2016

family pet silk paintings

Silk painting continues to be a favorite among the kids in the studio and I was excited to present the project to the children attending the Pets-n-Art summer camp.

Colby. 5 year old

Each child started off by creating a sketch of their pet on copy paper. I emphasized drawing their pet large on the paper so they would ultimately have lots to color on the silk.

Tiggs. 7 year old

Duffy 9 year old

I also find that I need them not to create small details because the resist has a tendency to expand on the silk and ultimately wiped out small details and the end result is just a white mass.

Pushka. 5 year old

Once they were happy with their sketch, I handed them a piece of silk I had already stretched on a bracket. I create my brackets either from pvc pipe, embroidery hoops, or in this case old embroidery stretchers that I have acquired from women in the local needle arts guild who are purging their stash.

Q-Bert and Fiddy.  9 year old

Q-Bert. 7 year old

I placed a thick book on the table which each child could lay down their paper sketch and then the stretcher board over top of that to trace their drawings onto the silk without causing the silk to "pop off" the stretcher.

Woflie. 7 year old

At this point, we went on to another project and overnight I added resist to over each child's line work. In the past, I let the kids do this part too but because of the range of ages in the camp felt it best this time if I managed this part. The next morning when I went over the things they could do with the dyes on silk, I did show them how I applied the resist too so they understood this step.

Pushka. 7 year old

The next morning it was time to paint the silk. Lots of excitement as the kids applied the dyes and more than once a child would excitedly call me over to share what they discovered the dyes could do on the silk.

"cosmic" Kali. 8 year old

Violet. 10 year old

One of the things I had presented to the kids prior to their painting was the fauvist art movement. We talked about color being a tool to show personality or emotion and many of the children decided to create their pets in a variety of colors they felt reflected the personalities of their pets.

Ginger. 4.5 year old

Others simply had fun just applying mass amounts of color to the silk and watching it move around.

Sandy. 9 year old

Aussie. 7 year old

Once the kids were finished painting, I set the dyes and then applied the silks to a canvas board. The next morning, I handed out some permanent black markers and allowed the children to add in any details in black they felt their artwork needed and to sign their names.

Aussie. 5 year old

Needless to say, once again silk painting proved to be a fun and exciting project, one the kids seemed to throughly enjoy almost as much as I enjoyed sharing it with them.


Tuesday, July 26, 2016

charcoal pet portraits

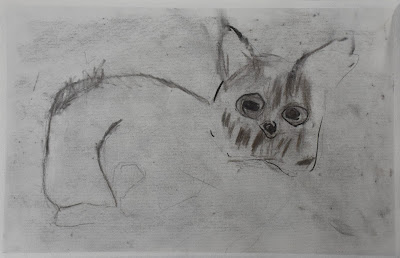
Each child in the Pets-n-Art camp had the opportunity to create a portrait of their pet in charcoal. First, each child just covered a piece of white charcoal paper with a charcoal rubbing that they then blended into the paper using either their hand or paper towel.

Krystal. 7 year old

I had each child start by creating a blind contour drawing. I find this is a great way for them to get shape onto the paper, really study and discover the subject, and take a bit of the fear of "too hard" out of the equation.

Pushka. 5 year old

If you look closely, you will see the original pencil drawings.

Fiddy. 9 year old

Once they finished the blind contour drawing, I told them they could correct anything they wanted using the charcoal. I had to convince some of them that no one would pay attention to the original drawings in the end. I asked them to focus on the contour line from head to tail on their pet first with the charcoal.

Pushka. 7 year old

Then using a gummy eraser, I asked each of them to take out all the highlights they saw on their pet reference picture.

Tiggs. 7 year old

From there, I asked each of them to use the charcoal and color in all the darkest areas on their pet. By having them pay attention to shapes of white or black, it does what I call "shut off the brain" and they no longer draw what they think they see but what they really see. 

Some of the kids were quite taken aback when these two steps were finished with what they had on the paper. They were so excited to see that it was in fact not so hard to draw their pet.

7 year old

From there, using either white charcoal or the black charcoal, they began to add the tones into the work, blending as they went to create their final work.

Ginger. 4.5 year old

Colby. 5 year old

As you can see, this project was something a wide variety of ages were able to complete. 

Aussie. 7 year old

Duffy. 9 year old

Although everyone, including me, was quite dirty at the end. We kind of looked like coalminers instead of artist.

Violet. 10 year old

Sandy. 9 year old.

I am so impressed with the work the kids created. Even more thrilled with what they learned about drawing in the process. 

Kali. 8 year old

I am pretty sure more than one of these will find their way framed and on the walls at home. Don't you agree?