Showing posts with label art birthday party. Show all posts

Monday, November 27, 2017

watercolors inspired by "winter" animals

A lovely young girl had her eighth birthday party here at the studio a couple of weekends ago.

She loves watercolors and wanted to do something with animals that live in the snow. In past workshops and camps, she has gravitated towards penguins so I wasn't that surprised she chose to do an animal theme picture and winter animals to boot!

I pulled out reference for polar bears and penguins. I then had a couple of request for arctic foxes and snow bunnies. All easy request for me to fulfill.

I taped down large sheets of watercolor paper and gave the party guest time to work out their sketches on practice paper before transferring them onto the watercolor paper.

We discussed finding the shapes of the animals to begin a sketch and also how they could make artist choices to simplify their compositions from what they saw on the reference and even a bit about abstracting their animals and what that actually meant.

They then traced over their drawings with sharpie pen.

I gave a quick demonstration on some of the techniques they could utilize with the watercolors, wet on wet, scratching, salt, and blooming.

I then handed out a palette of primary colors and black.

Before they started I shared with them how they didn't have to paint their animals realistic colors, they could paint "crazy" colors that evoked feelings, temperature or was just their favorite color.

The birthday girl was using a diving polar bear for reference and she created an amazing sketch but was unhappy with her upside down polar bear, as she wasn't quite sure she wanted the bear diving underwater. Together we discussed and brainstormed all the different reasons her polar bear could be upside down.

birthday girl

And here is what she came up with, pretty fabulous.

grade 3

grade 3

These two friends used the same snow bunny for reference but I love the how interesting the compare/contrast is between the two artworks. Although the sketches are very similar the artist choices made afterwards are unique to each child. From choosing different directions for their paper, background and how they painted their rabbits.

grade 2

This arctic fox created by the youngest party goer was fun to watch. At the start, she used her watercolor paint as regular paint and had put it on thickly on one side and declared she needed more. I challenged her to see if by adding water she could get that blue paint to cover the entire paper and she was quite surprised to see that she actually could do it. She was then lost in adding more colors to the blue, trying her hand at using the water to bloom the color and of course, had a lot of fun adding salt. Her fox was a very solid blue at the end when she told me she was finished and so I handed her a bit of paper towel and asked her to find the highlights on the reference and blot them out with the papertowel. Love her use of brushstrokes around the fox to lead the viewer into her artwork.


grade 3

The simplicity of this diving penguin is in my opinion genius. I love that the young artist was brave enough to leave out the facial features even and look at the way she used her brushstrokes in the water to created a downward motion with the penguin!

grade 3

And this happy, leaping polar bear painted in pink! How sweet. Again we brainstormed a bit about what might be in the hand of that bear and she giggled at some of the ideas. No surprise this happy bear ended up holding a present while being created at a birthday party.

grade 3

grade3

And then there were these two penguins. I am so impressed at the restraint each used when using color and although these look simple, they took just as much time for the young artist to create.

At the end when it comes time to sign their names, I always give a little talk about making a mindful decision on how to add their names to the pictures. After spending an hour and half creating the pictures, we don't want the name that was written in less than thirty seconds to be the first thing the viewer notices in the artwork.  Children quickly catch onto this concept and I am always amazed at some of the creative ways they implement their names into the artwork afterwards.

Happy 8th Birthday Miss T!! Thank you for letting me share in your special day.


Monday, October 17, 2016

8 year old birthday party dog paintings

Yesterday there was a birthday party for a very sweet girl turning eight years old.

She wanted to do an art project around her pet Cocker Spaniel, Callie. So her mother sent me some photographs of Callie to choose from and I printed off two of them for the partygoers to use for reference.

Each child created her own original sketch of the dog and then using carbon paper, traced it onto the acrylic paper.

birthday girl

Each artist began by painting in the background. Using only primary colors, I encouraged each girl to mix their colors directly on the paper for more interesting results. 

grade 3

I walked by immediately after the cheeks and nose were added to this picture. How cute are those cheeks?!!! And the addition of the hat? Love it.

During the course of painting there were lots of questions like, "Can I paint the dog a different color?"

What a great lead in for the opportunity to paint the dog in a color that reflects their personality. We spent a bit of time discussing what this meant while they painted the backgrounds. I think the girls got a kick out of yelling out colors that might represent silly, angry, calm, sad and of course, happy!

Although no one ventured outside of making Callie a brown dog instead of a blonde one.

grade 3

I am always amazed at how perfectly artwork reflects the personality of each artist. This little artist was very exuberant and outgoing and her work is too!  Look at everything going on in this picture. What a narrative. I couldn't resist asking her to tell me what was going on in her artwork and I was not disappointed in the story, there is a second dog jumping over Callie- who is wearing a lovely pink bow and what I can only guess are blue shoes or socks? No matter what, she is definitely dressed up for the occasion of having her portrait painted.

There were lots of questions about whether or not they could add accessories to their dog too. I always find it shocking when kids ask me permission to do things in their own artworks but I encouraged them to each follow their own instincts to please themselves when creating their dog picture.

Rapper Callie

By giving them the freedom to express themselves within the project of creating a painting of the birthday girl's pet, the results are unexpected and contain amazing moments of childhood imagination. 

Just look at Callie dressed up as a rapper! Right down to her baseball hat backwards and gold dog chain collar around her neck. Simply priceless.

grade 3

I love how this artist decided to represent the grass. What a great pattern she created! And the simple addition of the matching bow to the collar is adorable.

grade 3

I was quite smitten with the expression captured on this artwork. Doesn't Callie look pleased with herself? I hope the artist was pleased with herself after finishing this sweet picture.

grade 3

I dare you to resist those big puppy dog eyes the artist created in this painting. If this was my dog, it would be very fat as I would never be able to say no to "just one more treat" with eyes like those.

grade 3

The pink touch on the dog tag is brilliant. It was interesting to watch this young artist work throughout the hour and a half. Each and every brush stroke was thought through, as was every addition of color.  So much thought went into this artwork.

grade 3

This painting. 

The fact the artist mixed white into each color is wonderful. The party hat, which I might add were given out to each artist to wear at the beginning of the party, on top of the dog's head. And the expression she created on the face!! To me it looks like Callie is so not impressed with the having to wear a party hat to humor the human people.

This painting oozes personality.


As the artist started finishing, I gave them each a piece of charcoal to go back into the work and add black lines where they thought it was needed. Then we hung them up for everyone to admire while they ate cake and opened presents.


I loved how different each painting turned out even though they were all using the same reference material. 

What a darling group of girls to spend a couple of hours with while they celebrated their friend's eighth birthday. They giggled and talked nonstop, enjoying each others company completely.


Happy Birthday Miss G!!
Thank you for letting me be apart of your special day.


Saturday, November 28, 2015

Watercolor Butterfly Birthday Party

Yesterday afternoon there were ten children here to celebrate an eight year olds' birthday. The theme was butterflies and so I created a project using watercolor where each child would create a large butterfly painting.

I put out some reference for the artist to use and spent a bit of time showing them how to blend color, (they had only the primary colors and black) and several different techniques they might want to use when painting.

Instead of working out their sketches prior on working paper, I had the kids draw directly on the watercolor paper. I stressed drawing lighting so if they wanted to change a line they weren't left with a pencil mark on the paper after erasing, since any pencil mark will show through the paint.

The paper was so large that the working sketches would not of worked anyway and it was a great lesson for the kids to learn to work within mistakes since most still drew too hard and had lines showing on their paper even after copious amounts of erasing.

But without those extra marks, works like this would not of been created.


The green design is a direct result of having to incorporate the original wing she created on the left side. She decided it was too small but because she could not get the pencil mark to completely erase when redrawing the wing, she used that mark to create an interesting design that she then mirrored on the rest of the work.  She was very proud of her finished art in the end.


Using the liquid watercolors and exploring all the things they can do is always quite exciting for kids. Many get lost in the process and suddenly find themselves looking at a paper covered in so many different colors their subject matter gets lost.


Such was the case with these three artworks. The girls looked at me for help as they knew their butterflies were lost in all the color. What a great opportunity for them to develop problem solving skills and learning to think outside the box. 

The above two works were fixed by going over all the variety of colors in the butterflies with one solid color to bring it together then while they had pizza and cake, I went over their original sharpie lines with black india ink. These two things combined left the final works vibrant and quite beautiful.


This artist had every color in the rainbow on her paper, both on the background and the butterfly. She went over all the color in the background with a blue/black mixture she made and then added salt on top so some of her colors would show through.  I think all three works came out lovely in the end and are a great reminder for the artist to not give up and with a bit of ingenuity on their part, still find success no matter how daunting things might be in the beginning.

birthday girl!!

I love the way the birthday girl created the background on this work. Using blooming, salt, and a wet on wet technique that allowed the colors to mix and blend on their own, she got some very interesting results. I love how it works against the graphic nature of her drawings. Stunning!


This is a really lovely example on how adding black to the color can give beautiful muted results. I think it takes a lot of courage at eight years old to add black to bright color and she rose to the challenge marvelously. This is so pretty.


This is just all kinds of cute. How awesome are the color decisions she made?  The warm palette with just a splash of cool?  So great. 


As this artist was putting in her blue background, she chose to create a flower design using a blotting technique with the paper towel. Can you pick them out?

Combined with the salt, it created a stunning result. She was very deliberate with each color choice and technique she made throughout the process and was very proud of her finished result. I don't blame her.


Then there was this piece. For all my talk of "draw the butterfly big", she did the exact opposite with flare. It was a great opportunity to show the kids how making the butterfly small when everything else is large still puts the focus on the butterfly. The size combined with the color decisions she made created a wonderful result.


And finally the lone boy in the room, the birthday girls' big brother, who wanted nothing to do with butterflies. I gave him some bug reference to take a look at and he decided on created a centipede work.

Lots of singing, lots of yelling, lots of fun. Thank you Miss C for letting me take part in your special day.  

Happy 8th Birthday!!!


Monday, November 9, 2015

Sugar Skull themed birthday party

There was a birthday party on Sunday for a 10 year old who loved Sugar Skulls.

And when I say love, I mean love.

She had on a t-shirt with a skull, skull earrings, and could not of been more excited about all the lovely handmade and bought decorated skulls her friends brought her.

Her mother even made this cake!

From scratch no less!!


I can't decide what I'm more impressed by, her decorating skills or the fact she didn't use boxed cake mix.

The girls sculpted their skulls and then while the sculptures were baking, enjoyed cake and opened presents. When finished I put out permanent black markers and colored markers for them to begin decorating. 

The girls all made such interesting and unique design choices.  As the party came to an end, I put out some tissue scraps for them to add flowers. 

I think the girls were all quite pleased with themselves at the end of the party.  


How cute is this "hippie skull". (I think that is what I heard one of the girls call it.) You can only see a little of it, but she did an amazing "pointillism" feature going down the back of the skull in a variety of color.


Aren't these two skulls darling? How great are the peace signs in the eye sockets?! I love how the artist used the purple on the above skull to highlight the facial features.


Look at all the work on this skull! I'm quite amazed all that got done before the party ended. I love how these girls surprised me with the tissue flowers. I had never thought about using a variety of colors to create the flowers and no student has done that before. I wish I had gotten a good picture of it, but this artist used a variety of colors to build up her flower on top of the head, which is perfect given all the color she has going on in the skull.


What's not to love about these next two skulls? The environmental theme of the first one is quite darling. Trees, hearts, peace signs...all good things the world could use right now.


Love the large sun and the way the artist created the radiating lines to show warmth. Maybe it was the torrential rains we had the day before that inspired the design? I don't know, but I'd love a warm sunshine day around here about now.


I wish I had a moment to find out the story behind the animal the artist placed on her skull. I find it quite intriguing. I do love the color palette of this work and am impressed with the constraint the artist showed in her limited palette when faced with a hundred different marker colors on the table.


I feel quite confident saying the party was a success. I have a wall painted from floor to ceiling in chalkboard paint and at the start of the party, while waiting for all the guest to show up, the kids usually decorate it for the birthday child.  As the birthday girl was waiting for her parents to pack up to leave, she was looking at the wall and exclaimed to her mother, "Mom! Someone wrote you're party was awesome!". This made her so happy.

No doubt each child created awesome artwork.

Happy 10th Birthday Ms. Z!  Thank you for letting me be apart of your special day.

Tuesday, October 27, 2015

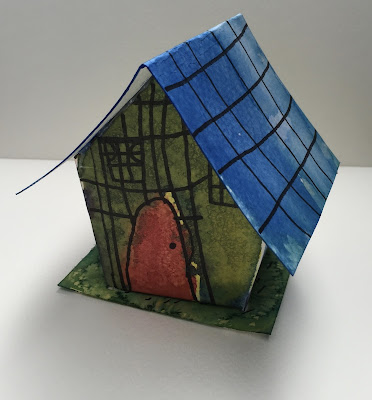
painting and building paper birdhouses

This past Sunday there was a birthday party at the studio for a little girl turning six.

When her mother called, she said her daughter's request was she wanted to build something. A birdhouse perhaps?

I went round and round with ideas, but settling on something that was age appropriate, worked with a large group and could be completed in an hour and a half proved more challenging than I expected.

Until I started playing with ideas of building with paper!

Because of the girls ages and time constraint, I cut out the bird templates prior to the party and had them ready to assemble.


There were three parts, the house itself, the roof, and the "ground".  I placed these on the table, along with a permanent marker and the supplies needed for watercolors.

Once all the first graders arrived, we got started.  I gave each girl a palette of liquid watercolor in the primary colors.


I had them start with painting the piece that would become the ground.  I figured it was a great starting point for them to get a feel of what the watercolors could do while learning how to blend colors they wanted and play with a couple of techniques.  I also asked them some open ended questions of what they might find on the ground if they were looking and they shouted out some great ideas. 

This particular house covered most of the ideas, it also happens to be the birthday girl, her ground is covered with spiders, worms, and birdseed.


When they finished the ground, I had the girls move onto painting the roof piece. Again with a couple of open-ended questions, we discussed different ways they could design and paint the roof. There were lots of ideas and many interesting solutions created by the artist.


There were spiders and birds.


Some traditional roofs in slate and tile and a multitude of rainbow colored roofs with many different interesting patterns.

Then the girls began designing their homes. I asked them to think about their own houses and then what a bird might like in a home. Some of the artist simple applied color to the house while others created detailed exteriors.


I love the warm light emitting from the window against the dark exterior of the house.  Doesn't it just welcome you home?

Once they finished painting the house exteriors, it was time to get to work putting the pieces together. I did not anticipate the girls spending as much time as they did on the roofs and ground and so we were unfortunately running short on time if the girls were to eat pizza and cake before their parents arrived for pick up.

I put out some fast drying glue on paper scraps with Qtips for the girls to apply the glue onto the house flaps. I asked them to hold the pieces together and count to 50.

Now here is one of those "who knew" moments I run into as an art instructor. Counting out loud together as a group was LOTS of fun. The girls loved it and counted way past 50, which was great because I wanted to add a piece of tape over the flap to help keep the house in place until the glue really had time to set up and harden.

Then they placed glue on the bottom flaps and added the ground. I gave them pencils and told them to use the eraser as a hammer to put it in place. Then they added the roofs.  All but two stayed in place with no problem.  So while the girls ate their pizza and enjoyed birthday cake,  I hot glued the two remaining roofs to make them stick.

I love these sweet little houses and how unique each one turned out.  The girls were all quite pleased too when they left the party.

birthday girl


Happy Birthday Miss S!  Thank you for letting me be apart of your special day.