Showing posts with label sculpture project. Show all posts

Saturday, April 30, 2016

shadow boxes

I have run a couple of different projects using boxes of late. I picked these wooden boxes up at the local craft store for under a dollar each and with an additional 20% off coupon for the entire purchase, they became an affordable option to buy in bulk for projects in the studio.

I used all the projects as a good example of creating background, mid-ground and foreground.

I first used the boxes with the Wednesday elementary class where the girls created "affirmation boxes".

10 year old

We discussed filling our heads with positive messages and to think about a message they felt was important to remind themselves of each day. I told them they could create whatever imagery they wanted to go with their message.

6 year old

We were having record breaking heat for Vancouver during this class and it seems ice cream was front and center on all the girls' minds because every single one of them focused on ice cream cones. I have no explanation for this whatsoever as I really left the project open ended as to what they put into their boxes.

6 year old

The six year olds are BFF's in class, so I'm not surprised to see them doing the same thing, but the two older girls surprised me with also focusing in on the cones.

9 year old

All I can say is that this ice cream cone was just so awesome when created that every other girl was inspired to create an awesome cone too.

red monkey, 5 year old

The elementary class had so much fun building their boxes, I next create a project for the 4-5 year old class using animals....because what 4-5 year old doesn't like animals?!

All of the above projects were created with acrylic paints on acrylic paper.  The back of the boxes were first painted with the backgrounds directly on the box. (I put masking tape on the front so they didn't get paint on them) Then the animals were drawn, painted and cut out. 

They kids adhered them inside the boxes with these round circle things that had adhesive on both sides. I have no idea what they are called, so round adhesive circle things is what you get.

horse, 4 year old

The children then created some paper pieces to create a foreground. These were glued directly on the front of the box or again added with those round adhesive things if they were going inside (this time stacking two round circle things together so it stuck out in front of the mid ground).

Finally I ran a morning workshop on a professional day at school, kids get the day off so teachers can plan. For this project, I shared a large photo book on the history of the circus. The boys were quite fascinated by some of the pictures from the 1920's, 30's, and 40's- especially the Side Shows. After we had looked at the book far longer than I had anticipated, lots of discussion on what was culturally appropriate in times past that would not be appropriate today, each boy picked something that was particularly interesting to them to create a circus montage.

dancing bear balancing on ball, 9 year old

The only thing different about this project is that instead of paper for the main imagery, the boys used oven baked clay and then painted it once cooled.  They had a lot of fun creating these boxes, so much fun they used up 2.5 hours of the workshop! I was not expecting it to take that long at all.

man monkey smoking pipe, 9 year old

This box was inspired by a sideshow poster the artist saw in the book called "Darwin's Missing Link", the Man Monkey. The piece 'evolved' a bit as the artist did not deem it necessary anymore to include Darwin in the piece. Sorry Darwin, evolution....

And finally this work was inspired by the circus book and the new studio pet, ParaPete the Parakeet. Except now he's PiratePete the Parakeet!

PiratePete the Parakeet, 8 year old

ParaPete looks pretty fancy sporting an eyepatch. He'd probably enjoy a stint as a pirate.

I have a few boxes left and a few new projects in mind. The kids have had a great time working within the confines of the box and they were a great purchase for the studio, exemplified by the several different projects shown here! 

If you happen across some of them while trolling the aisles of your local craft store, give them a go! I don't think you or your kids will be disappointed.


Thursday, April 7, 2016

Paul Klee inspired hand puppets

I'm on to the second week of spring break camps!

I held both a morning and an afternoon camp at my studio, both with different themes. The morning camp focused on an art history theme where the kids did works inspired by famous artist. My objective was to present artist or works that were not the usual fare the kids are exposed too.

And first up were these hand puppets created by Paul Klee for his son when he was young.

hand puppets created by Paul Klee

I fell in love with them the moment another artist friend posted them on Facebook. I immediately added the art book focused on this collection of puppets created by Paul Klee to my studio library because I knew the kids would fall in love too.

And I wasn't wrong.

These puppets were not originally recorded as part of Paul Klee's work because they were never meant for public viewing, these were works of art created solely for the enjoyment of his son, Felix. A toy for entertaining himself by creating puppet shows. They were so popular with his son that every year Klee added a few more to the collection. A collection that unfortunately did not survive intact but what does remain is marvelous.

Klee created these with found objects, so you will see all sorts of things used to create each puppets unique personality. The kids were fascinated with the book and we spent a very long time viewing it and laughing at all the different puppets, guessing their names, and discovering interesting details.

Then they got to work creating their own puppets to enjoy.

Paul Klee inspired puppets created in camp

This project was one of those moments I felt like the world's greatest art teacher. It was a success from the moment I presented it and I was deeply smitten with each and every work created by the kids.


The kids embraced this project with the enthusiasm only kids can bring to a project and the creations are unique and come from an imaginative place that only a child can pull from, that place as adult artist we desperately try to tap into once again.

Above front and center is "Silly Warrior" created by an eight year old. (the puppet with the hammerhead for a hat and his tongue sticking out) 

Unfortunately this is the only picture I have of it as the artist loved hand-sewing his cloth and took it home overnight to finish while I was photographing the rest of the puppets. He brought it back on the last day of camp but with all the craziness of the last day of camp I somehow forgot to take a picture.

10 year old, "Angel of Death"

On the first day of camp, each artist started by creating a ball of newsprint covered in masking tape and then stuck a wooden dowel into the paper and secured it with more masking tape. Then using plaster strips began to create the head.

7 year old, "Mr. Joy"

I had never used plaster strips before and will never use anything but plaster strips moving forward whenever creating a "paper-mache" project. The kids didn't mind the mess on their hands, it was easier for them to manipulate, and it dried very quickly. 

8 year old, "Whiskers"

While they were putting on plaster strips, I brought out a box of junk that I collect of random found items. Wine corks, screws, buttons, and other odds and ends.....including a hammerhead without a handle even! The kids were welcome to take whatever they wanted from the box that sparked their imagination and embed it into the plaster, similar to what they had seen in the original puppets created by Klee.

10 year old, "Blue Genie"

Blue Genie has a cork stuck on the top of his head, while "Mr. Joy", (pictured above), has a screw and toothpicks embedded into his.

The directions on the plaster said it would dry in two hours, however I found that these puppets needed two days. I'm not sure if it was because the artists were overzealous in adding layers or the fact that they were able to fold strips to mold noses and such, but much to the kids' chagrin, we had to wait until Wednesday in order to add paint and facial features.

7 year old, 'Kitty" (she's holding a ball (glass marble) in her mouth

Another great things about the plaster, it did not need any prepping prior to using acrylic paint. Each child used the paint to create features inspired by the puppets made by Paul Klee. They also once again had access to the junk box and some fabric scraps to add accessories to their puppets. I stood at the ready with a hot glue gun to add their additions under each artist direction.
9 year old, "Captain Zeppelin"

This portion of the project had every single artist engaged in a way that I have rarely seen, each child spent so much time playing with the junk, trying different things out before committing to their final choices. The excitement in the air was palatable as each child excited shared what was coming from their imaginations with each other.

There was so much laughter and joy in the studio that morning.

We spent much longer than I had anticipated with this portion of the project and ran out of time to add the fabric skirts, so I promised we would finish the puppets the next morning.

12 year old, "the Fanciful Masquerader" 

Adding the skirt is the only part of the project I would modify when doing it again, oh and I will be presenting this project again!

And again.

And again.

My thought was to have the kids hand sew on the skirts. This was not only unsuccessful, but also frustrating to the kids. I'm not sure if it was because they were rushing in excitement to see the puppets finally complete or an unrealistic expectation on my part, regardless I ended up hot gluing the skirts around the neck of the puppet. In the future I will do this part upfront and then try letting them hand sew on bits of fabric scraps and buttons to the skirt to add interest. I think that will be far more enjoyable and engaging for kids.


The kids were so excited to have the puppets done. The last day of camp was spent watching them create puppet shows that brought their creations to life. As I sat there watching them play and enjoy their handcrafted toys, I imagined I felt much like Paul Klee did all those years ago while watching his son at play. Such a sense of satisfaction and so rewarding to see the project bring such joy to each child. Like the kids, it was a moment of pure happiness for me too.

Will I do this again? you bet

Will I tell every art instructor I meet to try this project? absolutely!

No wonder Paul Klee continued to add a few puppets every year to his son's collection. Who could blame him after watching how much joy these imaginative puppets brought into the lives of the young artist who were part of the "Studying Under the Masters" camp.


Tuesday, October 27, 2015

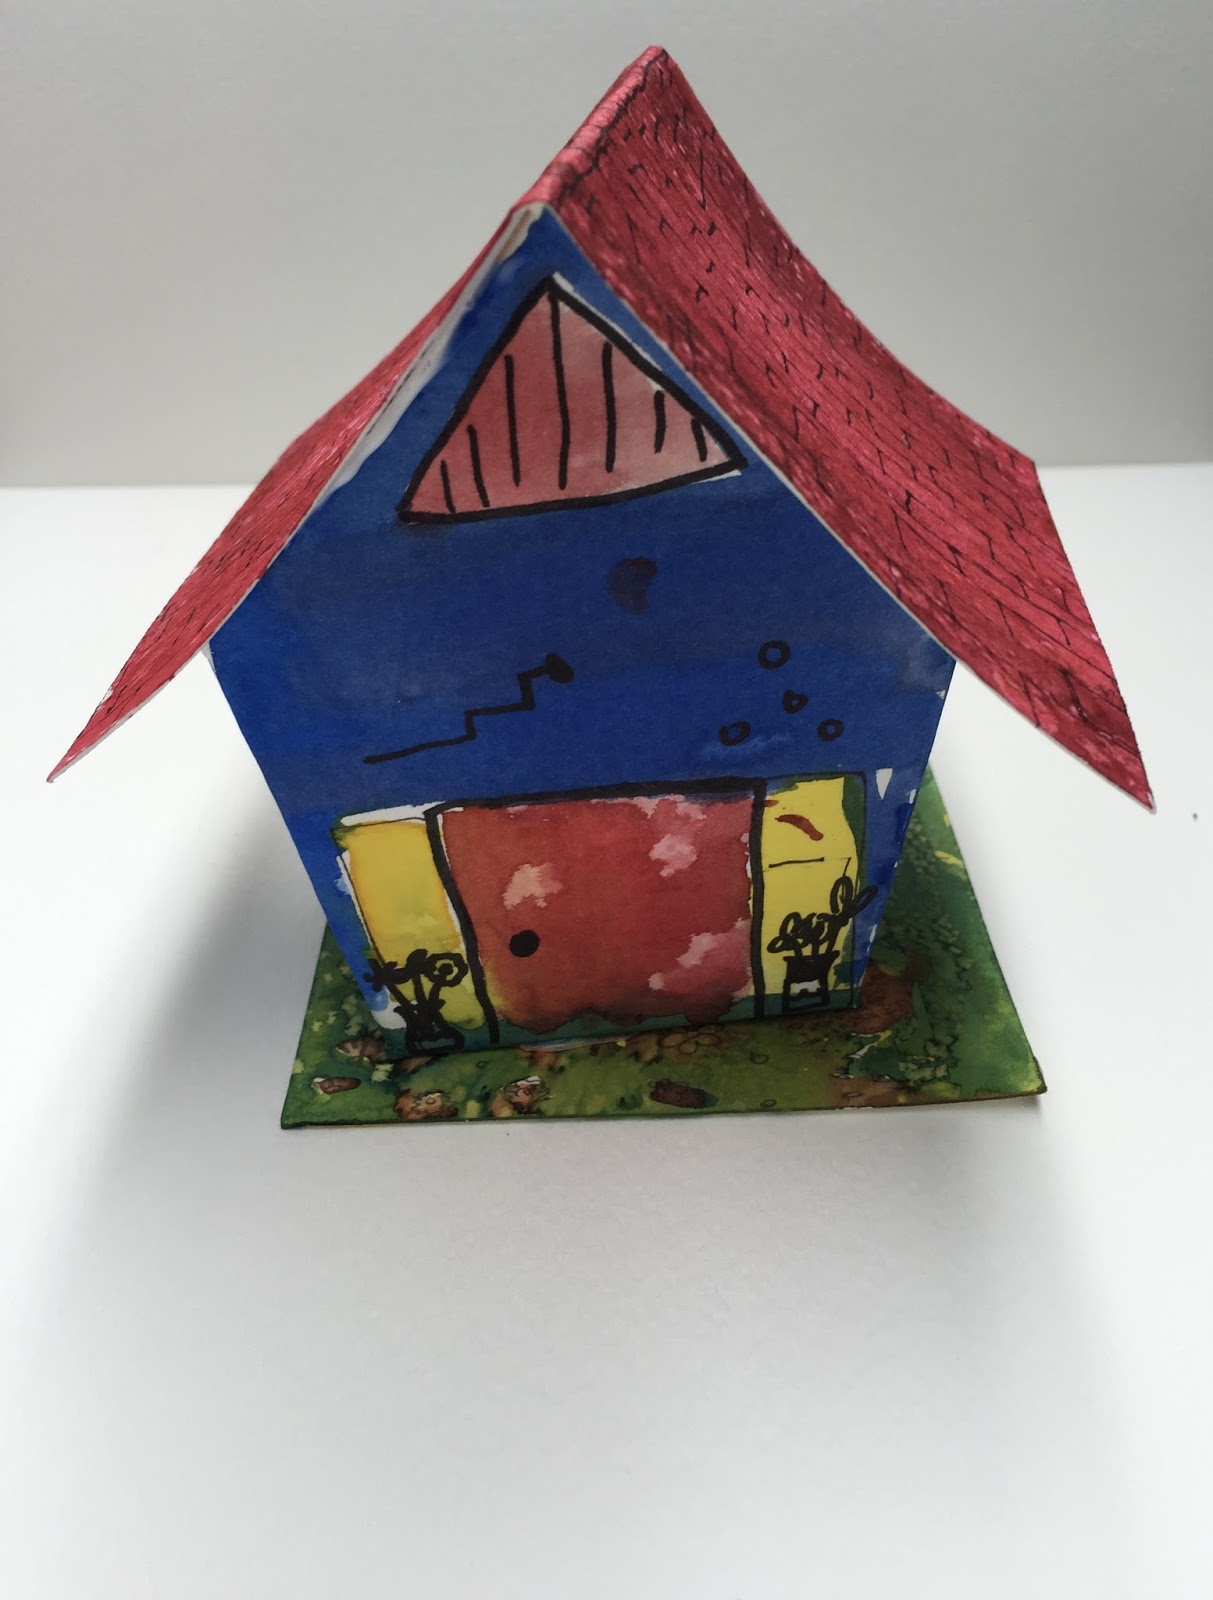
painting and building paper birdhouses

This past Sunday there was a birthday party at the studio for a little girl turning six.

When her mother called, she said her daughter's request was she wanted to build something. A birdhouse perhaps?

I went round and round with ideas, but settling on something that was age appropriate, worked with a large group and could be completed in an hour and a half proved more challenging than I expected.

Until I started playing with ideas of building with paper!

Because of the girls ages and time constraint, I cut out the bird templates prior to the party and had them ready to assemble.


There were three parts, the house itself, the roof, and the "ground".  I placed these on the table, along with a permanent marker and the supplies needed for watercolors.

Once all the first graders arrived, we got started.  I gave each girl a palette of liquid watercolor in the primary colors.


I had them start with painting the piece that would become the ground.  I figured it was a great starting point for them to get a feel of what the watercolors could do while learning how to blend colors they wanted and play with a couple of techniques.  I also asked them some open ended questions of what they might find on the ground if they were looking and they shouted out some great ideas. 

This particular house covered most of the ideas, it also happens to be the birthday girl, her ground is covered with spiders, worms, and birdseed.


When they finished the ground, I had the girls move onto painting the roof piece. Again with a couple of open-ended questions, we discussed different ways they could design and paint the roof. There were lots of ideas and many interesting solutions created by the artist.


There were spiders and birds.


Some traditional roofs in slate and tile and a multitude of rainbow colored roofs with many different interesting patterns.

Then the girls began designing their homes. I asked them to think about their own houses and then what a bird might like in a home. Some of the artist simple applied color to the house while others created detailed exteriors.


I love the warm light emitting from the window against the dark exterior of the house.  Doesn't it just welcome you home?

Once they finished painting the house exteriors, it was time to get to work putting the pieces together. I did not anticipate the girls spending as much time as they did on the roofs and ground and so we were unfortunately running short on time if the girls were to eat pizza and cake before their parents arrived for pick up.

I put out some fast drying glue on paper scraps with Qtips for the girls to apply the glue onto the house flaps. I asked them to hold the pieces together and count to 50.

Now here is one of those "who knew" moments I run into as an art instructor. Counting out loud together as a group was LOTS of fun. The girls loved it and counted way past 50, which was great because I wanted to add a piece of tape over the flap to help keep the house in place until the glue really had time to set up and harden.

Then they placed glue on the bottom flaps and added the ground. I gave them pencils and told them to use the eraser as a hammer to put it in place. Then they added the roofs.  All but two stayed in place with no problem.  So while the girls ate their pizza and enjoyed birthday cake,  I hot glued the two remaining roofs to make them stick.

I love these sweet little houses and how unique each one turned out.  The girls were all quite pleased too when they left the party.

birthday girl


Happy Birthday Miss S!  Thank you for letting me be apart of your special day.

Thursday, October 23, 2014

October Owls

The Monday afternoon art class started off the year focusing on owls.

It is October after all.

I went to the library and pulled a lot of reference books on owls for them to mull over and then they started by creating sculptures.


elf owl, 7 year old

I love the elf owl.  The owl itself is just about life size.  For those who don't know (i.e. me before the artist starting telling me all about this species), this owl is very small and lives inside of cacti.  I love that this little boy did not worry about making the cactus actual size but put one in to represent the owls environment only.

barn owl, 10 year old

Oh these eyes!  How could you deny this little fellow anything?  So stinking cute.

11 year old

And finally the artist who after looking at all the books, took the bits and pieces she liked and created an owl out of her imagination.  Love the nest she decided to place the barn owl in too.

Once they finished their sculptures, I gave them an opportunity to paint their owls in acrylic.

elf owl, 7 year old

I expected the cactus to make another appearance, but love that the artist decided to focus in on the owl itself in this picture.  I wouldn't mess with him.  He may be small, but he is mighty.

barn owl, 10 year old

I love the simplicity of this work.  She did such a wonderful job keeping the lines and details to a minimum, which has a wonderful effect on the work.

11 year old

I have learned to trust implicitly this artist vision.  She usually takes a left turn after I introduce the project and although I can't always connect the dots as she is explaining her ideas, when left alone she creates surprising and amazing work.  I would of not thought to put a sunset with the owl, but I think it works wonderfully!  I love the moon up high starting to make an appearance in the sky too.

I don't have to wonder hoo had fun creating this work, from the amount of laughter in the room it was evident all of them had a good time.


Wednesday, October 22, 2014

Sugar Skulls and teaching moments

School year classes started at Kudzu in the beginning of October, not that you would know it from the lack of posting on my part.  It was due to a calamity of errors on my part that needed fixing by my better half, husband, who was in Hong Kong the past three weeks for work.

Which seemed to mostly consist of sending my pictures of the protest two blocks from his hotel to turn my head grey, but that's another story.

The Wednesday class began with creating Sugar Skulls out of clay.  I brought out a couple of skulls for them to look at for reference and off they went.  While they were creating their skulls, I told them a bit about the holiday that takes place in Mexico and what a wonderful way it is to remember loved ones who have passed away. 

When they were finished, I pulled out sharpie pens, acrylic paints and glitter glue for them to use to decorate their work.  As time ran out, I had pulled out some crepe paper for them to make flowers to glue on also and promised the girls we put the flowers on at next week's class.

Here is how a couple of skulls looked at the end of class that day.


Although it is a little hard to tell in the above skull, both of these students chose to use glitter glue in the eye sockets.  I thought it looked quite marvelous.


Unfortunately when I came back to the studio the next afternoon to teach, gravity had played a part in their creations and the glue that was once in the sockets, now ran down the face.

7 year old

Unexpected, yes!  Ruined, no!  At least not as far as I was concerned, I thought it turned out quite interesting and I knew this particular student would more than likely LOVE the results.

And when she arrived at class that next week, her response was just as I expected - a huge grin and a exclamation of "cool!"

7 year old


I was not quite as confident in regards to the other little girls' response and she was definitely unsure at first.  I think it helped that her friend was so enthusiastic about the changes, but for her, the skull was suppose to be happy...not sad.   So we talked about all the times people cry "happy tears", which then seemed to make everything OK.  

From my perspective, she wasn't so much as upset that the glue had ran but wrestling with how that interpreted into what she was wanting to convey in her sculpture.  Once she realized that people do in fact sometimes cry when they are extremely happy, she had no problems with gravity getting involved in the fun.

8 year old

Their other friend who also used the glitter glue a little less enthusiastically had no problems with gravity and so we took a minute to talk about why the glue ran on some and not others.  Without help, they all surmised  the glue had been applied to thickly. 

And so through the process, they learned.  I'm sure they will come back to this moment in the future when applying paint, glue, or other materials and remember the time when they applied things to thickly and they ran down the work over time. I believe even the student who did not have issues with running glue will also file the results away to utilize at a later date.

Most importantly, they learned to embrace the unexpected.  One of those great life lessons we all need when navigating through this world because as all adults know, you have a plan and then sometimes life has another plan. 

A lesson these students passed with flying colors while creating their sugar skulls.


Sunday, September 14, 2014

A Prickly Endeavor

I came across some really cute little terra-cotta pots prior to camp starting last week.  And when I say little, I mean so little I can't even imagine what you would plant in something that small, however they were perfect for me to have students create sculpted cacti.


And as with all things, there was lots of chatting as everyone began working on the project.  

I had the kids start by creating a base out of tin foil and sticking it in the pot.  Once the students were happy with the height and skeletal structure of their work, they started pushing in the "dirt" (i.e. clay) around the bottom of the pot.

And the chatter continued as they started creating their cactus, covering their tin foil in the clay and sculpting out the details.

I was making a cactus alongside them to keep in the studio and I mentioned I was feeling a little grumpy and tired that morning- basically like a prickly cactus.

Which suddenly led to conversation of different cactus personalities

Which lead to student's cacti evolving into little characters.

It was a really fun period of time in the class as the students were all gathered around one table and laughed amongst each other as they developed their cacti.  Lots of sharing of what they were creating and positive support of each other's ideas.

All good things.

Some students admired the developing personalities of other student's cactus but chose to not do the same, staying on the original planned course I had introduced with the project, a traditional potted plant.  

I think both ideas came out really fun.

Once they had their sculpture complete, I handed them each a bit of wire and a pair of scissors.  They then spent some time cutting the wire and sticking it into their cactus.

Because what's a cactus without the spikes?

I have to be honest, I wasn't expecting them to be quite so prickly when I picked them up to bake.  The first one actually made me jump when I touched it.  It felt like the real thing!

Once hardened, the works were painted. 

At this point, some of the wires fell out which was disappointing for some of the kids.  

For the most part, all the spikes were stuck solid but I gave the students the option to dip the few wires that fell out back into the cactus with a little glue if it truly bothered them to lose some of the spikes.

Some students did this and some did not.

And then when the paint was dried, I gave each cactus a quick coat of glossy varnish to finish.

And here are the results.

First a couple of traditional cacti.

8 year old

10 year old

Here's a nice cactus.  She keeps her spikes down so you don't get pricked.  My understanding is she only raises up her spikes when she is angry.

7 year old

We have the champion fighter cactus!  Or as I like to think of him, Rocky Balboa.

11 year old

I believe this is Mr. Blob.  I hate when my memory fails and reminds me I'm getting old. (Sorry Ms. A if I got it wrong.  Send me a note and I'll correct the description!)

8 year old

Doesn't this one look like a cactus you don't want to mess with?  I'm guessing with the open mouth, this cactus is also a bit chatty.

11 year old

Then we had the cactus that might of partook in waaaaay too many doughnuts.  His belly is exploding out of his pot!

7 year old

And last but not least, the artistic cactus.

11 year old

I'm sure it is evident by the work shown above, but just in case you couldn't tell, the kids seemed had a whole lot of fun creating these sculptures from beginning to end.  They chatted and laughed the entire way through and had a good time admiring them all in the end.  Definitely a project I will put in my back pocket to use again one day.


One final note, the chess set camp for next week has been cancelled.  However there will be an all day camp running on Wednesday from 9-3pm.  Call 604-971-1147 to register.