After a few discussions with her and her mother, she decided to do a project on gelatin printmaking for her and nine of her friends.
Let me just say, there is not a rock concert in the world that holds a candle to the volume level of a small room filled with ten very happy and excited 13 year olds. I believe my ears might still be ringing.
The girls started off by sketching a butterfly shape on card stock and then cutting it out to use as a stencil.

birthday girl
Then I pulled out the gelatin plates. The girls were fascinated that they were using a jello substance to print on and even asked if they could eat it, which I quickly explained they could not since it also contained glycerine in the mixture.
They first started with a piece of bristol that was cut slightly larger than the gelatin plate. They "inked" the plate with some white, blue and yellow acrylic paint using a brayer, created some texture by stamping into the paint with some bubble wrap and burlap, then pulled a print.
I then asked them to put some blue paint on the burlap and stamp that into the plate, take the same piece of paper and pull another print.
Then using primarily white paint, asked them to once again color the plate, place down their stencil, and using the same piece of paper pull yet another print.

I had also given them two sheets of palette paper, the same size as the bristol.
(I think freezer paper would work just as well)
Using the non-waxy side of the palette paper, I asked them to pull a ghost print of the leftover paint on the plate.
Now I asked them to use black and blue to paint the plate. They laid down a bit of string and their stencil and now using the the second paper they had made a ghost print on, pulled another print.
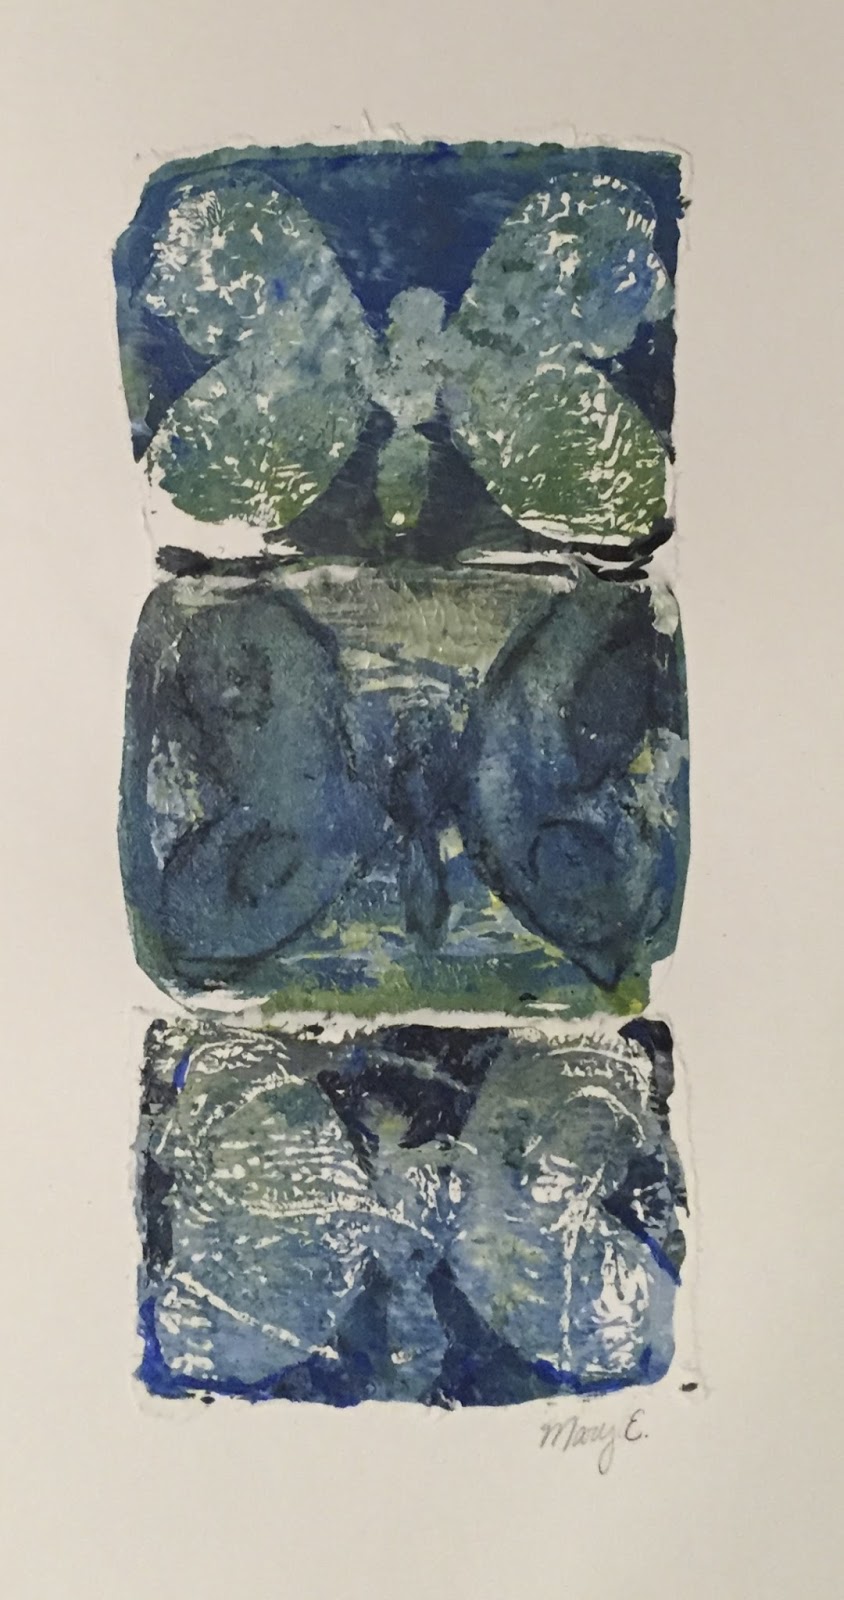
Then using the first piece of paper, the bristol, they pulled a ghost print using the leftover ink.
This made some of the girls unhappy, not going to lie. They liked the bristol print they already had and could not understand why they were printing on top of it again. They were even more unhappy when they pulled the ghost print as they lost a lot of the previous work.
But all was not lost because once again, they added a lot of white to the plate, laid down the string and the stencil and pulled the last and final print on the bristol paper, the first paper they started with and voila! that is the middle print you see on all this artwork.
Happy girls again.

Now with the leftover white ink on the plate, they took the final piece of palette paper and made a ghost print using the non-waxy side of the paper.
Once more laying down blue and black paint, the string and the stencil, they took one final pull using the third paper.
They now had three complete prints of their stencil and a stencil that was barely hanging on in one piece. Thankfully they no longer needed it to complete the project and could throw it away.
At this point, I told them they could go into their work with a small paintbrush and add any details they wanted. I stressed trying to stay loose and use the brush sparingly so they did not loose the essence of the print work they had just finished.

Once done, we gave the tables a quick clean and began mounting the three prints. The idea was the combine them so it looked like one piece.
The girls first cut the bristol paper to the paint lines using scissors and glued it down in the center of the paper.

I then showed them how they could use the top of the paintbrush dipped in water to "cut" the two palette papers. All you do is create a line with water and then gently pull. This gives a very organic edge to the work, which lets it blend nicely into the bristol paper when pasted on top.

Or not, as this artist decided to do. She wanted all three prints separate and it's good to see the project looks just as nice. I love when students stay true to themselves and in the process teach me something new about a project idea.
Anyway the idea of "cutting" with water and the back of a paintbrush made some girls quite unnerved and so I assured them it was fine to use scissors if they wanted too.

They cut out the last paper, using either scissors or the paintbrush and water, and glued it on top of the bristol paper. For glue, we used just a basic glue stick, nothing fancy.

And once all three pieces were mounted together, each girl had the opportunity to add a bit of charcoal into their butterflies for one last bit of detail.
Then it was time for cake and goodie bags.
And more squealing, giggling, and general noise at a decibel level that would impress any rock band.
The birthday girl had taken the time to make each goodie bag reflect the likes and personality of each friend. Is that not the sweetest? I think it was a great example of the character of girls in the room that night.
I hope they all had fun, I sure enjoyed meeting them.
Happy 13th Birthday Ms. A!!
No comments:
Post a Comment